Sunday, May 28, 2023

PowerShell: StringBuild AppendLine lessons from C

Two years ago I wrote a post, PowerShell: Inadvertently Returning Multiple Values from a Function and low and behold I found a found a common C# data type that is a common culprit of this issue, StringBuilder. I have coded C# for twenty-tree years and I did not realize the each Append* method of StringBuilder returns a reference to the StringBuilder.

To demonstrate consider this C# snippet:

var builder = new StringBuilder();

builder.AppendLine("Environment Properties:");
builder.AppendLine($"MachineName: {Environment.MachineName}");
builder.AppendLine($"UserName: {Environment.UserName}");
builder.AppendLine($"UserDomainName: {Environment.UserDomainName}");
builder.AppendLine($"OSVersion: {Environment.OSVersion}");
builder.AppendLine($"ProcessorCount: {Environment.ProcessorCount}");
builder.AppendLine(
  $"Is64BitOperatingSystem: {Environment.Is64BitOperatingSystem}");
builder.AppendLine(
  $"SystemDirectory: {Environment.SystemDirectory}");
builder.AppendLine($"CurrentDirectory: {Environment.CurrentDirectory}");

Console.Write(builder.ToString());

In the documentation for the AppendLine method, AppendLine(String), the return value of AppendLine and each Append* method of StringBuilder is defined as follows:


A clearer way to write the above code in C# would be acknowledge the return value and to ignore it:

var builder = new StringBuilder();

_ = builder.AppendLine("Environment Properties:");
_ = builder.AppendLine($"MachineName: {Environment.MachineName}");
_ = builder.AppendLine($"UserName: {Environment.UserName}");
_ = builder.AppendLine(
      $"UserDomainName: {Environment.UserDomainName}");
_ = builder.AppendLine($"OSVersion: {Environment.OSVersion}");
_ = builder.AppendLine(
      $"ProcessorCount: {Environment.ProcessorCount}");
_ = builder.AppendLine(
      $"Is64BitOperatingSystem: {Environment.Is64BitOperatingSystem}");
_ = builder.AppendLine(
      $"SystemDirectory: {Environment.SystemDirectory}");
_ = builder.AppendLine($"CurrentDirectory: {Environment.CurrentDirectory}");

Console.Write(builder.ToString());

The following code shows PowerShell invoking AppendLine multiple times:

function Get-EnvironmentProperties {
    [System.Text.StringBuilder] $builder = [System.Text.StringBuilder]::new()

    $builder.AppendLine("Environment Properties:")
    $builder.AppendLine("MachineName: " + [Environment]::MachineName)
    $builder.AppendLine("UserName: " + [Environment]::UserName)
    $builder.AppendLine("UserDomainName: " + [Environment]::UserDomainName)
    $builder.AppendLine("OSVersion: " + [Environment]::OSVersion)
    $builder.AppendLine("ProcessorCount: " + [Environment]::ProcessorCount)
    $builder.AppendLine("Is64BitOperatingSystem: " + [Environment]::Is64BitOperatingSystem)
    $builder.AppendLine("SystemDirectory: " + [Environment]::SystemDirectory)
    $builder.AppendLine("CurrentDirectory: " + [Environment]::CurrentDirectory)

    return $builder.ToString()
}

$result = Get-EnvironmentProperties

Although it appears that the PowerShell function, Get-EnvironmentProperties, returns a string. Result (the return value from Get-EnvironmentProperties) in an array of 10 elements:


The method AppendLine is invoked nine times so the first nine elements of the array. The tenth element of the array (index of 9) is the string return in the last line of function, Get-EnvironmentProperties.


Below show a variant of the EnvironmentProperties function suppresses the return value from StringBuilder's AppendLine:

function Get-EnvironmentProperties {
    [System.Text.StringBuilder] $builder = `
          [System.Text.StringBuilder]::new()

    $builder.AppendLine("Environment Properties:") | Out-Null
    [void]$builder.AppendLine("MachineName: " + 
              [Environment]::MachineName)
    $builder.AppendLine("UserName: " + 
              [Environment]::UserName) > $null
    $null = $builder.AppendLine("UserDomainName: " + 
              [Environment]::UserDomainName)

    return $builder.ToString()
}

Suppressing the StringBuilder returned by AppendLine results in the the correct behavior, the lone return value is as string as is show below:


A variety of mechanism were show to suppress return value of AppendLine. From the performance stand point, Out-Null is the slowest but from a readability stand point, it is the most readable for all levels of PowerShell developer.

In my code I used the following approach as I learned C as my first programming language:

    [void]$builder.AppendLine("MachineName: " + 
              [Environment]::MachineName)

With regard to performance and suppressing the result of a method/expression StackOverflow has an excellent post on the topic What's the better (cleaner) way to ignore output in PowerShell? A response by JasonMArcher demonstrates and Out-Null has the worst performance.


Monday, May 8, 2023

Visual Studio Code: Disable Format on Save per-File (including wildcards)

In this post, we'll explore how to disable the formatOnSave option for specific files, multiple files, using wild cards, and files with certain extensions.


Disabling formatOnSave for a specific file

To disable formatOnSave for a specific file, you can add the following setting to your settings.json file:

"[file path/filename.ext]": {
    "editor.formatOnSave": false
}

Replace file path/filename.ext (noted in boldface) with the path and filename of the file for which you want to disable formatOnSave.


Disabling formatOnSave for multiple files

To disable formatOnSave for multiple files, you can add the following setting to your settings.json file:

"editor.formatOnSave": true,
"[file path/filename1.ext]": {
    "editor.formatOnSave": false
},
"[file path/filename2.ext]": {
    "editor.formatOnSave": false
}

Replace file path/filename1.ext and file path/filename2.ext  (noted in boldface) with the path and filenames of the files for which you want to disable formatOnSave.


Disabling formatOnSave using wildcards

You can also disable formatOnSave for files that match a specific pattern using wildcards. For example, to disable formatOnSave for files that have a specific prefix, you can add the following setting to your settings.json file:

"editor.formatOnSave": true,
"[prefix]*.ext": {
    "editor.formatOnSave": false
}

Replace prefix  (noted in boldface) with the desired prefix for the files you want to exclude from formatOnSave.

Similarly, to disable formatOnSave for files that have multiple possible extensions, you can use a wildcard to match the extensions. For example:

"editor.formatOnSave": true,
"[file path/*.ext1, *.ext2]": {
    "editor.formatOnSave": false
}

Replace file path with the path to the directory containing the files you want to exclude from formatOnSave. Replace ext1 and ext2 with the extensions of the files you want to exclude from formatOnSave.

Conclusion

And that's it! With these settings, you can easily disable the formatOnSave option for specific files, multiple files, or using wildcards.

Sunday, May 7, 2023

Visual Studio Code: Disable Format on Save (settings.json: formatOnSave=true) per-File-Extension

I worked with two good engineers who loved auto format code (PowerShell) using Visual Studio Code's settings.json attribute. So I asked ChatGPT how to ignore the formatOnSave feature (trying out ChatGPT). Here is how to ignore Visual Studio Code's formatOnSave for a specific file extension. The steps to achieve presented.

If you want to exclude specific file types from being formatted on save, you need to configure Visual Studio Code to ignore those file extensions.

Step 1: Open the User Settings in VS Code

To configure the Format on Save feature, you need to edit the user settings in VS Code. To do this, open the Command Palette by pressing Ctrl+Shift+P (Windows) or Command+Shift+P (macOS), and type "Open User Settings". You should see "Preferences: Open User Settings" in the list of suggestions. Select it, and the settings.json file will open.

Step 2: Add the File Extensions to Ignore

In the settings.json file, you need to add the file extensions you want to exclude from the Format on Save feature. To do this, add the following code snippet:

"editor.formatOnSave": true,
"[md]": {
    "editor.formatOnSave": false
}

The code in boldface was added to the standard settings.json to ignore Markdown files. In this example, we're telling VS Code to enable the Format on Save feature globally ("editor.formatOnSave": true) and then disabling it for Markdown files ("[md]": {"editor.formatOnSave": false}).

Step 3: Save the User Settings

Once you've added the code snippet to the settings.json file, save the file, and you're done. The Format on Save feature will now be disabled for the file extension specified (the markdown extension, md).

Conclusion

In this blog post, we've seen how to configure Visual Studio Code to ignore specific file extensions when using the Format on Save feature. This can be useful if you want to exclude certain files from being automatically formatted when you save them. With just a few simple steps, you can customize this feature to suit your coding needs. 

Acknowledgments

I'd like to thank my high school typing teacher, Miss Joyce. I took one year of secretarial typing (on an IBM Selectric) and I type 120 WPM. I would like to think my mother for giving me the ability to write which I inherited from her. I would like that thank ChatGPT which wrote most of this blog. This is an experiment but ChatGPT is scary useful.

ChatGPT (writing PowerShell example) Will Replace Most of My Searches Targeting StackOverflow.com and Microsoft.com

The Old Way of Technical Search

The modus operandi I use for most of my software-development-related research is to:

  1. Search using Google (yes, I prefer the results to Bing).

  2. Search with keywords and typically target the site that will give me the best results using Google site keyword such as:

    2.1 Find the man page for PowerShell's Invoke-RestMethod cmdlet: Invoke-RestMethod site:microsoft.com. Note above the site: refers to microsoft.com.

    2.2 How to use PowerShell's Where-Object to select a value in an array of arrays: filter array of string arrays PowerShell Where-Object site:stackoverflow.com. Note above the site: refers to stackoverflow.com.

  3. Read through and click on the results. For Stack Overflow (I have loved Stack Overflow for the last fifteen years), this is tedious because a lot of results need to be culled to find an answer to your question.

ChatGPT: the New Way of Technical Search

As an experiment, I asked ChatGPT to help me with a piece of code (yes, I could have written this code without searching) but it is complex code. Here are the instructions I gave ChatGPT:

  • I want to have a PowerShell array of type [PSCustomObject[]] and each element of the array is type [PSCustomObject[]]. I want to select all values where index 4 equals 'monkey'.
  • I want to have a PowerShell array of type [PSCustomObject[]] and each element of the array is type [string[]]. I want to select all values where index 4 equals 'monkey'.
  • [string[]] $a = 'x', 'y', 'z'; [string[]] $b = 'e', 'f', 'g'; [string[]] $c = 'q', 'r', 's'; [PSCustomObject[]] $a, $b, $c. Select all values where array index 1 equals 'f'.
  • enum SegmentIndexes { Region Subregion State }. Select index [SegmentIndexes]::Region equals 'f'.

  • Use the array from the previous example. I am not interested in an array of enumerations.
  • Use the array before that.
  • Rewrite the code with no comments and please put the type in front of the declared variables
  • I did not ask you return $filterArray so the last line is not needed
  • Do not use a ; when populating the hashtable
  • You are incorrect. The ; are still used in the hashtable

Here is the code ChatGPT generated which is correct:

enum SegmentIndexes { Region Subregion State } [PSCustomObject[]]$array = @( @{ 'EmptySlot' = 'x' 'Region' = 'f' 'Division' = 'a' } @{ 'EmptySlot' = 'y' 'Region' = 'g' 'Division' = 'b' } @{ 'EmptySlot' = 'z' 'Region' = 'h' 'Division' = 'c' } ) $filteredArray = $array | Where-Object { $_[[SegmentIndexes]::Region] -eq 'f' }

Apology

Over the past few years, one of the best people I've worked with is Stephen Durant of Stack Overflow. He is a customer liaison to corporate users of Stack Overflow. I do not normally praise someone for doing their job, but Stephen is really elite at his work. So, Stephen, I apologize because ChatGPT has filled many more of my needs related to technical search.

Acknowledgments

This blog was proofed by ChatGPT.

Sunday, February 5, 2023

PowerShell: Create a GZip (*.gz)

PowerShell natively does not contain a CmdLet for creating a GZip file. There are third-party modules/CmdLets that create GZip. It is a straightforward process to access the CLI using PowerShell to create a GZip.

In support of creating a Gzip the following PowerShell functions were implemented:

  • New-GZipArchive: function that creates the actual GZip file
  • Close-Stream: helper function that handles closing/disposing the streams used.

The code is as follows:

function Close-Stream {
    param
    (
        [Parameter(Mandatory=$false)]        
        [System.IO.Stream] $stream
    )

    if ($null -ne $stream) {
        $stream.Close()
        $stream.Dispose()
    }
}

function New-GZipArchive {
    param
    (
        [Parameter(Mandatory=$true)]        
        [string] $sourceFilePath,
        [Parameter(Mandatory=$true)]
        [string] $destinationFilePath,
        [switch] $overwrite
    )

    [System.IO.FileStream] $sourceFileStream = $null
    [System.IO.FileStream] $destinationFileStream = $null
    [System.IO.Compression.GZipStream] $gzipStream

    try {
        if ($overwrite)
        {
            if (Test-Path `
                    -Path $destinationFilePath `
                    -PathType Leaf `
                    -ErrorAction:Stop) {
                Remove-Item `
                    -Path $destinationFilePath`
                    -ErrorAction:Stop
            }
        }

        [byte[]] $buffer = [System.Byte[]]::new([Math]::Pow(2, 20))

        $sourceFileStream = [System.IO.FileStream]::new(
                                $sourceFilePath,
                                [System.IO.FileMode]::Open,
                                [System.IO.FileAccess]::Read,
                                [System.IO.FileShare]::Read)
        $destinationFileStream = [System.IO.FileStream]::new(
                                    $destinationFilePath,
                                    [System.IO.FileMode]::CreateNew,
                                    [System.IO.FileAccess]::Write,
                                    [System.IO.FileShare]::None)
        $gzipStream = [System.IO.Compression.GZipStream]::new(
                $destinationFileStream,
                [System.IO.Compression.CompressionMode]::Compress)

        do {
            [int] $bytesRead = $sourceFileStream.Read(
                                     $buffer,
                                     0,
                                     $buffer.Length)

            $gzipStream.Write($buffer, 0, $bytesRead)
        } while($bytesRead -ne 0)
    }
    
    finally {
        Close-Stream $sourceFileStream
        Close-Stream $gzipStream
        Close-Stream $destinationFileStream
    }
}

Wednesday, December 21, 2022

Invoking Windows Service Manager from a PowerShell Console

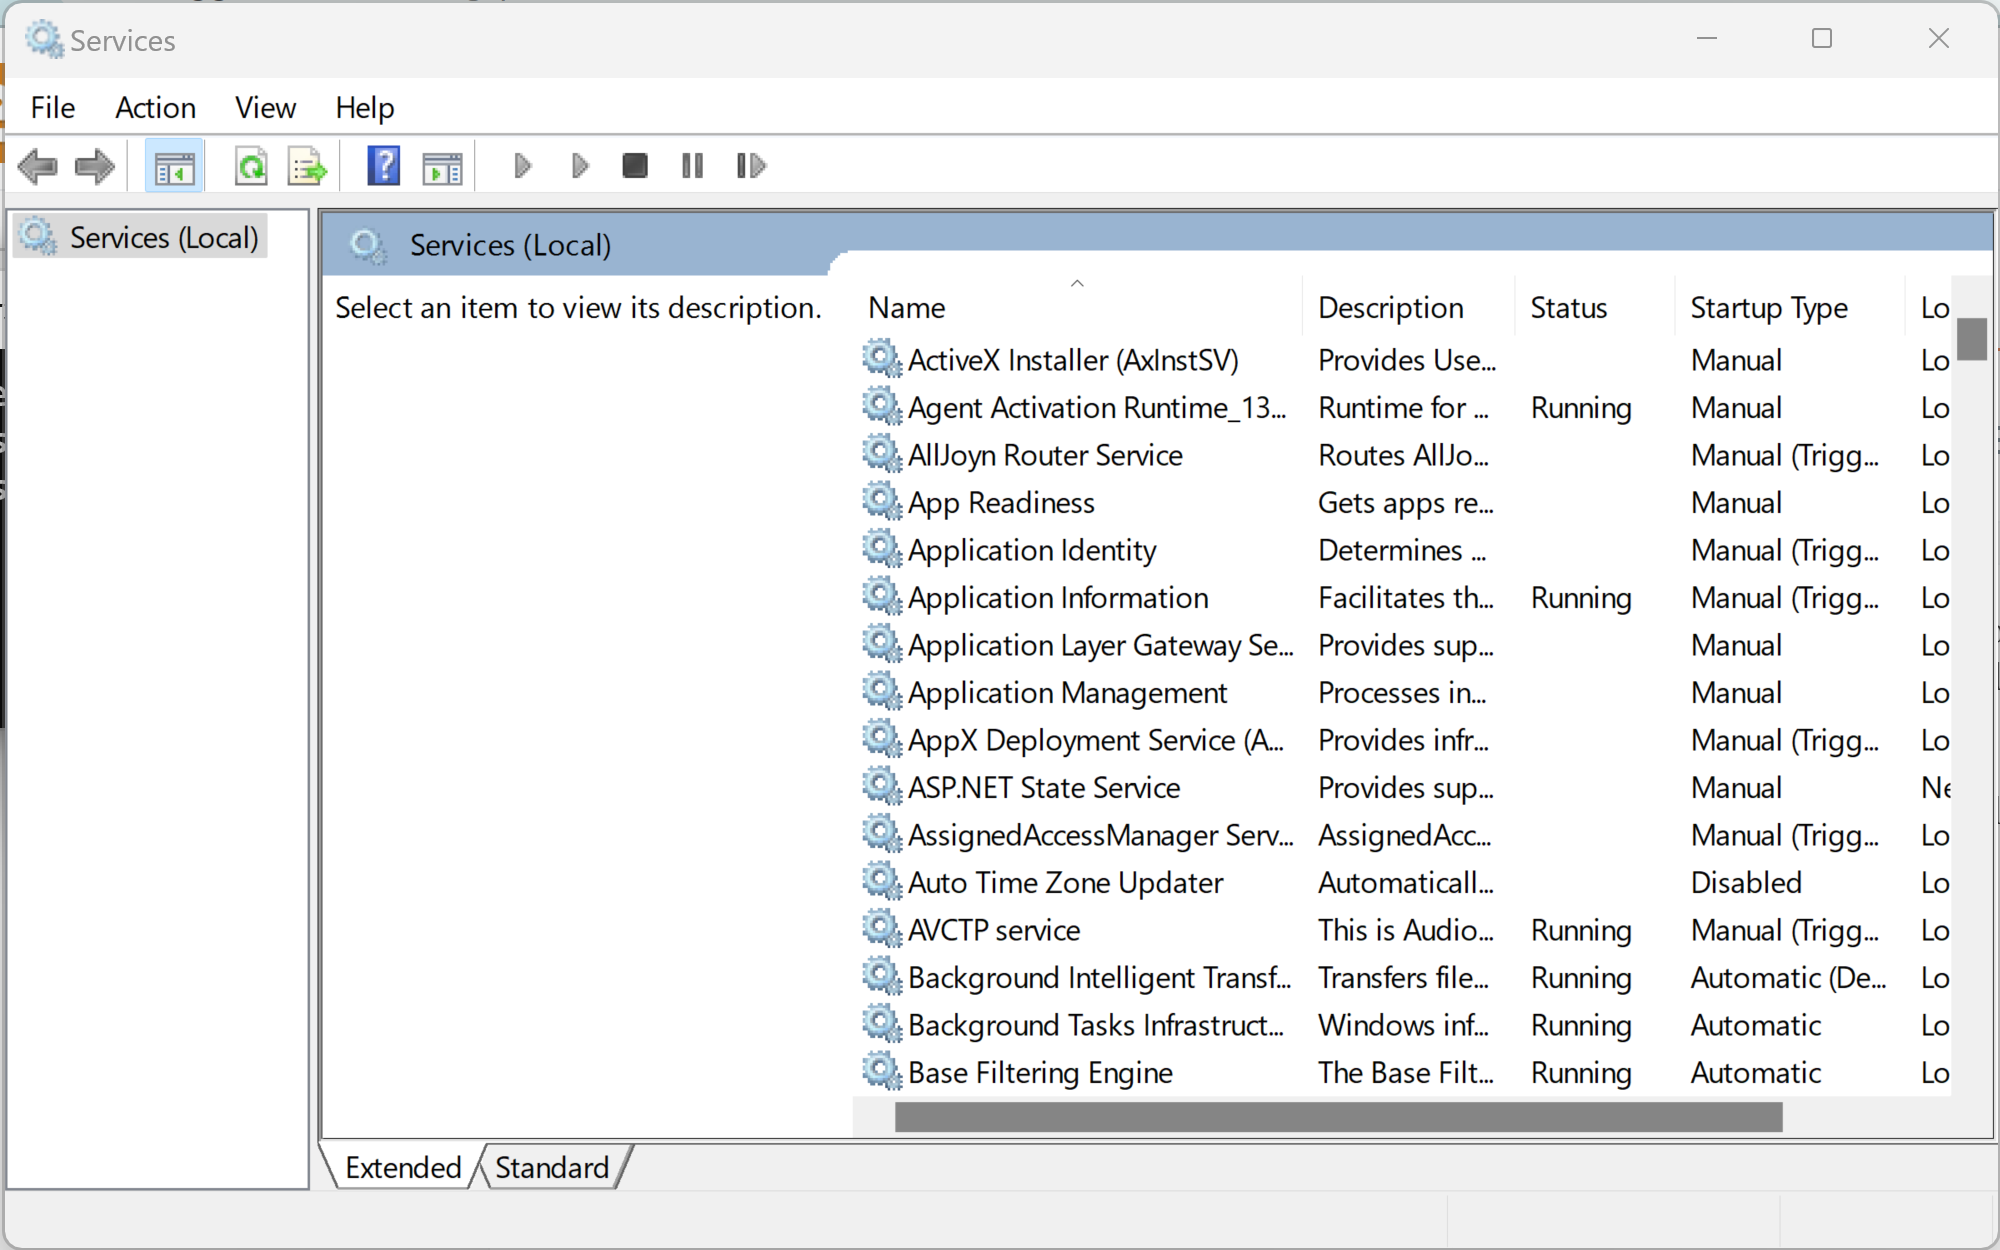
I worked in an environment where the only way to have administrative rights was from a PowerShell console. I fully recognize that Windows services can be fully managed via PowerShell cmdlets but to simplify things, I needed to run Windows Service Manager.

To invoke Windows Service Manager from PowerShell, run services.msc from a PowerShell console where the PowerShell console is running with administrative priveledges:


Services.msc as expected launches Windows Services Manager which can run because it inherited the administrative privileges of the PowerShell console:


Saturday, November 26, 2022

Azure: Generate a Bicep Template from an Existing Azure Resource using Visual Studio Code

Overview

The post presents how to generate a Bicep template from an existing Azure resource. The impetuous behind this post was an Azure application I was developing. I used Bicep to create eighty percent of my Azure resources:

  • Storage Account
    • Blobs
  • App Service Plan
    • App Service
  •  Service Bus
    • Queues

For Bicep development I used:

  • Visual Studio Code
  • Microsoft's PowerShell extension for Visual Studio Code
  • Microsoft's Bicep extension for Visual Studio Code: see Appendix A at the end of this post for instructions on how to install Visual Studio Code's Bicep extension

The application required Logic Apps and to create/configure the Logic Appls correctly, I used the Azure Portal (portal.azure.com). To complete the Bicep used to create the project's Azure resources, the Logic Apps needed to be Bicep-ized.

The steps required to extract a Bicep template for an existing Azure resource (such as a Logic App) are as follows:

  • Get the resource ID for the Azure resource for which to create a Bicep template
  • Use Visual Studio Code's Bicep extension to Insert the resource which will create the Bicep template for a given resource ID

The next two sections of this post present how to acquire the id of an Azure resource and how to generate a Bicep template from an Azure resource ID.

Get an Azure Resource ID using Visual Studio Code

To display, a resource's ID using Visual Studio Code, the Azure Resources extension can be used. This extension is installed as part of the Azure Tools extension (a package of multiple Azure-related extensions).  The previous post, Azure/Visual Studio Code: Installing Azure Tools Extension and Overcoming Azure Login Issues, demonstrates how to install the Azure Tools extension for Visual Studio Code. The previous post also discusses how to overcome login issues pertaining to the Azure Resource extension.

To invoke the Azure Resources extension which will be used to determine the target Azure resource's ID, click on the A-ish-shaped icon at the bottom of Visual Studio Code's activity bar. This will launch the Azure Resource extension:


As shown above, typing SHIFT+ALT+A simultaneously will also launch the Azure Resource extension:


Log in using your Azure credentials and if Azure Resources fails to log in after entering the correct credentials see the previous post, Azure/Visual Studio Code: Installing Azure Tools Extension and Overcoming Azure Login Issues, for instructions on how to address log-in issues with the Azure Resources extension.

After successfully logging into Azure, the Azure Resources extension displays, by default, the resources by resource type:


Recall that a Bicep template will be generated for a project's Logic Apps and Logic Apps are not in the resource types listed above. To remedy this, hover with the mouse over the Resources node in the tree of entities displayed by the Azure Resource extension:  


Click on the Group By button at the top of the Azure Resources extensions where the Group By button is the icon to the right of the + icon. Clicking on the Group By button displays a menu of Group By options:


From the group by drop-down, select Group by Resource Group shown below. Once the Azure resources are grouped by resource group it is easy to navigate to the project's Logic Apps or any resources associated with a resource group.

A truncated example of the per-resource group's resource is shown below where the image was truncated given the sensitive nature of resource names:


Right-click on the resource for which the Bicep template will be generated. This displays the following drop-down menu:


From the menu items, select View Properties which displays the properties as JSON file in a Visual Studio Code editor window:


Again, given the sensitive nature of Azure resource names and ID's, the properties of the resource are truncated. Obviously, the ID for the resource is easily identified.

There are other ways to get the ID for an Azure resource. These alternatives are addressed in the following sections of this post:
  • Appendix B: Get an Azure Resource ID using Azure Portal
  • Appendix C: Get an Azure Resource ID using the Azure Resources web app
  • Appendix D: Get an Azure Resource using Azure CLI

Bicep Extension Generating a Template using an Azure Resource ID

Before using the Bicep extension for Visual Studio Code, create an empty Bicep file into which the Bicep extension will copy the Bicep template for a given Azure resource based on the Azure resource's ID.

For this project, an empty file named, logicapp.bicep, was created.

The commands associated with Visual Studio Code's Bicep extension are invoked using Visual Studio Code's Command Palette (see: Command Palette). To display the Command Palette type the following keys simultaneously CTRL+SHIFT+P:


In the Command Palette's text box type: Bicep: Insert Resource until the command is recognized:


After selecting the Bicep: Insert Resource command in the Command Palette the following prompt is given based on the bicep files in the folder currently opened by Visual Studio Code:


From the list of files above, the file, logicapp.bicep, was selected. Once a file is selected, the following prompt is displayed:


Enter the resource ID previous looked up in the text box and press ENTER. This will generate the bicep template associated with the Azure resource ID. A truncated version of the Bicep file generated for the Log App is as follows:


Appendix A: Install Bicep Extension for Visual Studio Code

From Visual Studio Code's activity bar, select the extensions icon (the icon composed of four squares):


In the search box for extensions, enter the term, "bicep" which will display Microsoft's Bicep extension for Visual Studio code:


The landing page for the Bicep extension is as follows. Click on the install button to install the Bicep extension for Visual Studio Code:

Appendix B: Get an Azure Resource ID using Azure Portal

See the "Option: Get the resource ID from the Azure Portal" section from Tobias Zimmergren's blog, Generate Bicep templates from existing Azure resources with VS Code. This section of Mr. Zimmergren's blog is as follows (in case the link ever ceases to work):


Appendix C: Get an Azure Resource ID using the Azure Resources web app

See the "Option: Get a Resource ID with the Azure Resources web app" section from Tobias Zimmergren's blog, Generate Bicep templates from existing Azure resources with VS Code.

Mr. Zimmergren's blog in this section presents using https://resources.azure.com/ to retrieve the ID of an Azure resource.

Appendix D: Get an Azure Resource using Azure CLI

See the "Option: Get a resource ID using the Azure CLI" section from Tobias Zimmergren's blog, Generate Bicep templates from existing Azure resources with VS Code. This section of Mr. Zimmergren's blog is as follows (in case the link ever ceases to work):