Sunday, December 16, 2018

Git: Alternate Credentials in Azure DevOps (a.k.a. how not login with your email and Microsoft password)

Microsoft provides multiple types of Git repositories, Azure DevOps (formally known as TFS and Visual Studio Online) and GitHub. When accessing Git hosted on Azure DevOps, using email and password associated with your Microsoft account is sheer security folly. These credentials can log in to machines, access email, access MSDN benefits, access Azure, etc.

There is a simple solution to using the primary credentials (email/password), alternative credentials. At a high level, this just means that you can create username and password to use with an Azure DevOps Git repository and these are the credentials used to access Git. Alternative credentials are created by clicking on the user profile icon (see the JN in the upper-right below):


From the menu displayed by clicking on the user profile icon select the Security menu item:


When the Security menu item is selected, the User settings submenu is displayed;


From the User settings submenu select, Alternative credentials:


From the Alternative credentials panel, check the checkbox labeled Enable alternate authentication credentials.


Above a user named, redsox, was entered. Once Save is clicked an alternate username and password for accessing the Azure DevOps hosted Git repository is available. This username and password can be used as credentials for accessing any Git repositories associated with this Azure DevOps host Git repository. 

Thursday, December 13, 2018

Git on OS/X in Visual Studio Code

Getting Git to work with Visual Studio Code on OS/X takes a bit of finagling If interested, read on.

Install Git

OS/X has Git installed by default so there is no requirement to install Git in order to support integration with Visual Studio Code. To verify Git, from Visual Studio Code's View menu select Terminal:


In the Terminal window, type git --version and hit return:


The version git in the example above is 2.17.2. If Git is not found or if there is an error in configuration Git with Visual Studio Code, install the latest version of Git.

Azure DevOps Git: Setting up Alternate Credentials

A Git repository hosted in Azure DevOps is accessed via the web using a Microsoft ID (email) and password. Using these credentials with Git commands is an incredible security vulnerability. One workaround is to create alternate credentials for accessing a Git repository hosted in Azure DevOps Creating such credentials is discussed in: Git: Alternate Credentials in Azure DevOps (a.k.a. 

Determine the Repository to be Cloned

Git comes in many flavors Github (owned by Microsoft), BitBucket (owned by Atlassian) and Azure DevOps (owned by Microsoft). Below is an example of a Microsoft Azre DevOps repository (<vanity name>.visualstudio.com) and note that the Repos tab is selected on the left side:


Most flavors of Git place a clone button on their website. The Clone button is on the upper right above and clicking on it displays the following:


The URL to clone can be copied by clicking on the copy button to the right:
Notice also there is a button, Clone in VS Code.

Cloning via the Clone in VS Code button

Clicking on the Clone in VS Code is a feature that only works in a Microsoft Azure DevOps Repository and of course assuming that Visual Studio Code is the to be used to access Git. When Clone in VS Code is clicked on a dialog such as the following is displayed:


Clicking on the button, Open Visual Studio Code just opens Visual Studio Code. There is no initiation of cloning a Git repository.

Add Username to Git Clone URL

A URL used to clone git takes such as the following:
https://admiralgracehopper@dev.azure.com/admiralgracehopper/Frontend/_git/Frontend

Add the alternative username to the URL:
https://redsox%3APassingPlan@dev.azure.com/PassingPlan/Frontend/_git/Frontend

The %3A in the previous URL is just the HTML escape sequence for the colon character. The style of URL above is what should be used for cloning in Visual Studio Code.

Cloning Directly in Visual Studio Code

Visual Studio Code supports a Command Palette which on OS/X can be opened using ⇧⌘P (holding the shift-command and P characters at the same time). The Command Palette is a textbox that allows command-line style comments to be run against Visual Studio code.

To clone a repository, use ⇧⌘P, to open the Command Pallet and enter the following command followed by hitting the enter key: Git: Clone

When Git: Clone is entered in the Command Pallet, Visual Studio Code looks as follows:


Select Git: Clone from the drop down and you will receive the following prompt:


In the textbox (as shown above) paste the URL to clone which includes the username associated with the repository:


Pressing Enter (as instructed above) display the folder selection dialog so that the folder into which the directory clone is to be placed:


Saturday, May 12, 2018

Ubuntu (for the color blind developer): Removing colors from ls

The Ubuntu virtual machine I created under Azure displays the output from ls as follows:


The file names are in light grey and the directory names are in illegible dark gray.  A lazy approach to fixing this was presented in Git (for the color blind): Detecting changes to a repository, which was simply to pipe the output through more to strip of the colors (ls | more). An example of this is as follows:


The real issue is that some person, who hates people who are color blinded, decided to alias ls to ls --color=auto as is shown when all the aliases are listed courtesy of the alias command (see below):


To fix this flaw in the default Ubuntu configuration use unalias ls as follows:


Once ls is unaliased the output is legible as is demonstrated below:


Thursday, May 10, 2018

From JSON to C#


The problem is common. As a developer you are handed JSON (mostly likely from a RESTful web service). From said JSON you need to generated the corresponding C# classes.

Solution 1: Web Essentials

The approach with the tightest Visual Studio integration is installing the Web Essentials extension found at http://vswebessentials.com. After installing the extension create a C# file into which C# code will be generate. Below in example of a source file just waiting to be filled with C# generated from JSON:


Notice in the screenshot above the cursor is left where class will be generated.

Select the JSON text and copy it to the clipboard (CTRL-C). Once this open Visual Studio's Edit menu and select Past Special | Paste JSON As Classes:


An example of the code Paste Special |mJSON as Classes can generate is as follows:


Solution 2: json2csharp.com

The web site http://json2csharp.com provides the same service as the Web Essentials, Visual Studio Extension, Paste JSON As Classes. This site is simple to use. Paste in the JSON and click on the Generate button. An example of this is as follows:


Saturday, May 5, 2018

StyleCop: Setting to use it for a Solution with multiple Project Types (.NET Framework, .NET Core and .NET Standard Library)

StyleCop is a static code analysis tool from Microsoft targeting C# applications that is elegantly integrates with Visual Studio. In layman's terms, it makes developers code in a consistent manner. This post details how to setup StyleCop for projects that use the .NET Framework, .NET Standard and .NET Core.

The setup steps presented include the inclusion of a StyleCop configuration file, stylecop.json. The stylecop.json file is used for configuring the behavior of the static code analysis rules. The enabling and disabling of these rules is handled by a different mechanism. What stylecop.json does provide is a way to specify a company name and copyright to be used in the header documentation of each source file.

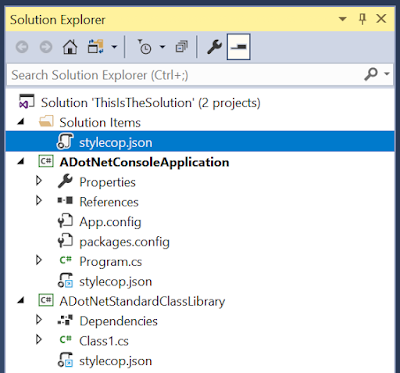
The sample solution for which StyleCop will be setup as as follows, a solution composed of a .NET Framework console application and a .NET Library class library:


The setup of StyleCop is identical for .NET Standard libraries and .NET Core so the projects above will demonstrate the setup differences.

The first step is setting up StyleCop is to right click on the solution Solution Explorer and from the context menu, select Manage NuGet Packages for Solution:


Selecting Manage NuGet Packages for Solution display the NuGet manger for the solution:


There are four tabs along to of the NuGet manager: Browser, Installed, Updates and Consolidate. Make sure the Browser tab is selected:


Enter StyleCop in the search text box which displays a list such as the following:


Select StyleCop.Analyzers and install the package for all the C# projects in the solution (for this example the projects are ADotNetConsoleApplication (.NET Framework 4.6.1) and ADotNetStandardClassLibrary). After installing the StyleCop.Analyzers NuGet package rebuilding our reveals a plethora of warnings courtesy of StyleCop:


One of the warnings is a clue to the next setup step:


To remove this error right click on each C# project in the solution in Solution Explorer and select Properties form the context menu:


As can easily be surmised, selecting Properties displays the properties that can be configured for the project:


From the tabs alone the left of the configuration window select Build:


When the Build properties are displayed scroll down to the bottom of the settings until the "XML documentation file" checkbox is visible:


Check the "XML documentation file" checkbox and close the properties window.Repeat the previous step of checking the "XML documentation file" checkbox for each C# project in the solution. The aforementioned, SA1652 Enable XML documentation output, warnings will no longer appear.

One error the continues to appear is the following:


Each file must begin with a standard header that includes the company name and standard copyright text. This is a matter of cut and paste but it raises an additional issue. How can the company name and copyright standard text be enforced across all source files. Enter the stylecop.json file and example of which is as follows:

{
  "settings": {
    "documentationRules": {
        "companyName": "Software Pronto, Inc.",
        "copyrightText": 
           "Copyright © {companyName} All rights reserved."
    }
  }
}

The stylecop.json file is just a text file which can be placed at the solution level and can be shared by each project in the solution. Am example of the stylecop.json added to the solution is as follows:


Instead of copying the stylecop.json file to project and adding it to each project the stylecop.json file can be added as link to each project where the link refers to the master copy of the file at the solution level. How to add linked files, specifically the stylecop.json file is reviewed in the previous blog post: Visual Studio (file linking): using Solution-level files in Projects. The solution with both projects containing the linked version of stylecop.json file is as follows:


stylecop.json has been added as link to both projects by neither project knows what build action to take with this newly added file. To configure stylecop.json for the .NET Framework project, ADotNetConsoleApplication, right click on the stylecop.json file in Solution Explorer and select Properties from the context menu:


Selecting Properties from the context menu displays the following, the properties for the stylecop.json file:


Notice in the properties that the Build Action is set to None which means the project has no idea what to do with the file. For a project targeting the .NET Framework, the correct Build Action is AdditionalFile. See below for the correct Build Actions assigned to this project stylecop.json file:


For the .NET Standard project the Build Action for stylecop.json is also set by right clicking on the file in Solution Explorer and selection Properties from the context menu. This displays the properties for the linked stylecop.json file which is clearly a different window that is shown for .NET Framework projects:


Notice in the window above that the Build Action is set to Content. The correct setting for Build Action is, C# analyzer additional files. Below is an example of the Build Action correctly set for stylecop.json for a .NET Standard Library or .NET Core project:


After the Build Action for the stylecop.json file has bee set to C# analyzer additional files, click on OK or Apply to record the change in Build Action. Remember this is how the Build Action is set for stylecop.json files for a .NET Standard Library or .NET Core project:

What remains to resolve the "The file header is missing or not located at the top of the file." warning. The following header text should be added to each C# file in the projects and of note, the company name and copyright text in the header match that specified in stylecop.json:

An example of the header used in (matching stylecop.json) in each C# source file is as follows:

//-----------------------------------------------------------------------
// <copyright file="AssemblyInfo.cs" company="Software Pronto, Inc.">
// Copyright © Software Pronto, Inc. All rights reserved.
// </copyright>
//-----------------------------------------------------------------------

It is important to note that the "file" documentation property must match the name of the C# source file.

The projects in this sample still generate warnings. Removing these warnings is an exercise left to the reader. These warnings are of course making the solution conform to the default rules enforced by StyleCop.

Appendix A: Why .NET 4.6.1 was select to work with .NET Standard 2.0

The article, .NET Standard, contains the following compatibility matrix showing that the highest version of the .NET Framework that is compatible with .NET Standard 2.0 is .NET Framework 4.6.1:


Wednesday, May 2, 2018

Visual Studio (file linking): using Solution-level files in Projects

In Visual Studio there are times when it makes sense to share a non-code file between multiple projects in a solution. One such scenario is when using the static code analysis tool, StyleCop. Among the rules StyleCop can enforce is that every source file in a project must contain a standard header including company name and copyright. For each source file, company name and copyright must match values specified in the StyleCop configuration file, stylecop.json. So the file to share between multiple projects is stylecop.json which can be added at the solution of a Visual Studio solution such as the following:


The solution contains two project, ADotNetConsoleApplication and ADotNetStandardClassLibrary. The goal is to add Solution Items\stylecop.json to both projects. To to this right click on the project, ADotNetConsoleApplication and select Add | Existing Item from the context menu displayed (see below):


When Existing Item is selected the following dialog is displayed (aptly named the Add Existing Items dialog):


Notice that the file filter is set to Visual C# Files. In order to see the stylecop.json file, change the filter to All Files (*.*) as follows:


Navigate in the Add Existing ITems dialog to the root of the solution and select the file stylecop.json.


Notice next to the Add button on the dialog there is a downward pointing arrow. Click on this arrow:


Click on Add As Link and once this is selected the file will show up in the project:


The master copy of the file is at Solution Items\stylecop.json and the linked version is under the ADotNetConsoleApplication project. Too add stylecop.json as a linked file to the ADotNetStandardClassLibrary project is a matter of repeating the steps shown above.