Tuesday, December 5, 2023

WSL/Bash: Removing Zone.Identifier


I copied files from an Ubuntu VM to laptop's WSL and suddenly all the files were garnished by Zone.Identifier. After some nudging, ChatGTP provided the following:

find . -type f -name '*:Zone.Identifier' -exec rm '{}' \;


Friday, November 10, 2023

PowerShell: Including Line Number in Write-Host

 I get a few comments on my blogs and today I received this comment on this post, PowerShell: $Myinvocation.ScriptLineNumber behaves incorrectly with Class Methods:

Here is a function that will include the same number as the Write-Host is on:

function Get-LineNumber {
    return "$($Myinvocation.ScriptLineNumber)"
}

Write-Host "$(Get-LineNumber): put your message here"

To see the line number of Write-Host consider the following screenshot:


When the above code is run (in this case Visual Studio Code using the PowerShell extension) the following is displayed showing the Write-Host is on line 5:

PS C:\Users\jann\Documents\PS> . 'C:\Users\jann\Documents\PS\Write-ExampleLineNumber.ps1'
5: put your message here


Saturday, October 21, 2023

Running Windows Applications as a Different User using System Internals ShellRunas

Using the runas command from a Windows console windows was demonstrated in the post,  Access SQL Server Management Studio using a different Active Directory Credential. The concept was that a user was logged in to Windows and an application (SQL Server Management Studio e.g. ssms.exe) needed to be run as a different user (hence the use of runas).

The much vaunted Windows Sysinternals was acquired by Microsoft in 2006 and among the useful utilities produced by Sysinternals is ShellRunas. As the previous documentation link shows:


Install ShellRunas Shell Extension

ShellRunas can be downloaded and zipped from Download ShellRunas. The download, ShellRunas.zip contains an executable ShellRunas.exe. To install ShellRunas as as a Windows shell extension, run the following from a Windows console terminal in the folder containing ShellRunas.exe:

.\ShellRunas.exe /reg

Invoking ShellRunas as shown above displays a dialog indicating the shell extension has been added;


Running ShellRunas from Explorer

To demonstrated on Windows 11 how to use ShellRunas navigate in Windows Explorer to the folder of the application (such as ssms.exe): 

C:\Program Files (x86)\Microsoft SQL Server Management Studio 19\Common7\IDE

From Windows Explorer right click on the application (such as ssms.exe) which displays a context menu such as the following:


The bottom option of the context menu is "Show more options." Select this menu item which displays the following context, sub menu:

From the above context menu select "Run as different user" which display the following dialog courtesy of Sysinternals ShellRunas:


The above dialog can be used run an application as a user that differs from the currently logged in Windows user.

Why Such Complicated Navigation?

ShellRunas dates back to February 26, 2008 and the era of WidnowsVista, Windows Server 2008, and President George Bush.  The example shell context menu shown at the top of this post is from Microsoft's ShellRunas documentation and is as follows:


The above context menu dialog box were displayed when right click on an executable that was run on Windows days of yore sometime a.k.a. some version before Windows 11.

ShellRunas used to be convenient. As of modern versions of Windows, ShellRunas is a handy utility with navigation that is a bit too complex.


Tuesday, October 17, 2023

Access SQL Server Management Studio using a different Active Directory Credential

There is no way to change the "User name" in SQL Server Management Studio's "Connect to Server" dialog when using Windows Authentication. This post demonstrates how to run SQL Server Management Studio (SSMS) and authenticate a connection using a different user than the current active Windows user while authenticating with Windows Authentication. For example, a user logs in with the normal account but needs to authenticate with an administrative account to access SQL Server.

An example of SSMS's "Connect to Server" dialog authenticating a connection with Windows Authentication is as follows:


The "User name" dropdown above is grayed out as it cannot be changed because Authentication is set to Windows Authentication. The Windows runas command-line utility (see Runas) can be used to run SSMS or any application as a different user than the user currently logged into a host. For this example, considering desiring to login as:

  • domain: domaidAbc
  • user: userEfg

To run SQL Server Management Studio as user domainAbc\userEfg, specify the following from a console prompt:

runas /noprofile /netonly /user:domainAbc\userEfg "C:\Program Files (x86)\Microsoft SQL Server Management Studio 19\Common7\IDE\ssms.exe"

Once the above command is run, the user will be prompted to enter a password for account domainAbc\userEfg:

Enter the password for domainAbc\userEfg:

There is no way to specify the password as a runas command-line option so the password must be manually entered.

The following is all the text displayed when running SSMS as a different user via the runas command:

C:\>runas /noprofile /netonly /user:domainAbc\userEfg "C:\Program Files (x86)\Microsoft SQL Server Management Studio 19\Common7\IDE\ssms.exe"
Enter the password for domainAbc\userEfg:
Attempting to start C:\Program Files (x86)\Microsoft SQL Server Management Studio 19\Common7\IDE\ssms.exe as user "domainAbc\userEfg" ...

At this point SSMS is running as user domainAbc\userEfg. There is a bit of a twist. Here is an example of the "Connect to Server" dialog displayed when running as user domainAbc\userEfg (note the grayed out User name is different,XPS17\jann):


When the Server name is specified and the connection to SQL Server is made, the user used to authenticate is domainAbc\userEfg and not the grayed out user.

Sunday, September 17, 2023

PowerShell/Azure Graph API: Improving the Online Documentation (Open Source Contribution)

Microsoft provides an excellent example of how to create a report of Azure App Registrations with expiring secrets and certificates (see: Export app registrations with expiring secrets and certificates). This script uses Microsoft's Graph PowerShell SDK module which is installed as follows:

Install-Module PowerShellGet

In Microsoft's sample the following PowerShell snippet is included in two separate locations in the code:


Obviously, that code could be more simply written as:


I logged into Github.com, edited Microsoft's example, and created a pull request. Withing 24 Hours it was approved and my change as adopted meaning the online documentation was updated to include my change:


Friday, August 25, 2023

Docker: Error Message "Windows Containers are not supported on your version of windows"

On a Windows host where Docker is configured to use Windows (versus Linux) contains the following error message, "Windows Containers are not supported on your version of windows", can be encountered. There are multiple reasons for this error message but one of the most common is that it is only possible to run Windows containers on Windows Pro or Windows Enterprise edition. Docker cannot run Windows containers on Windows Home or Windows Education edition.

Docker's setup instructions for Windows can be found at Install Docker Desktop on Windows. A the top of this web page, under System Requirements is the following (as of August 23, 2023):


There is nothing in the above documentation stating that Windows Home and Education only support Linux containers. There is nothing in the above documentation stating that in order to supports both Linux and Windows containers Windows Pro or Windows Enterprise is required.

Note: I have submitted a Pull Request to Docker's documentation repo (Docker docs)  requesting the text be changed to include the sentences "Home and Education editions support only Linux containers. Pro and Enterprise editions support Windows containers and Linux containers." alongside the Windows 11 and Windows 10 system requirements.

Dockers Windows install documentation (Install Docker Desktop on Windows) does include a note well below the "System requirements" tab that presents which editions of Windows are required in order to run Windows containers:


Monday, August 14, 2023

Windows 10: Install Windows Terminal Without Windows Store

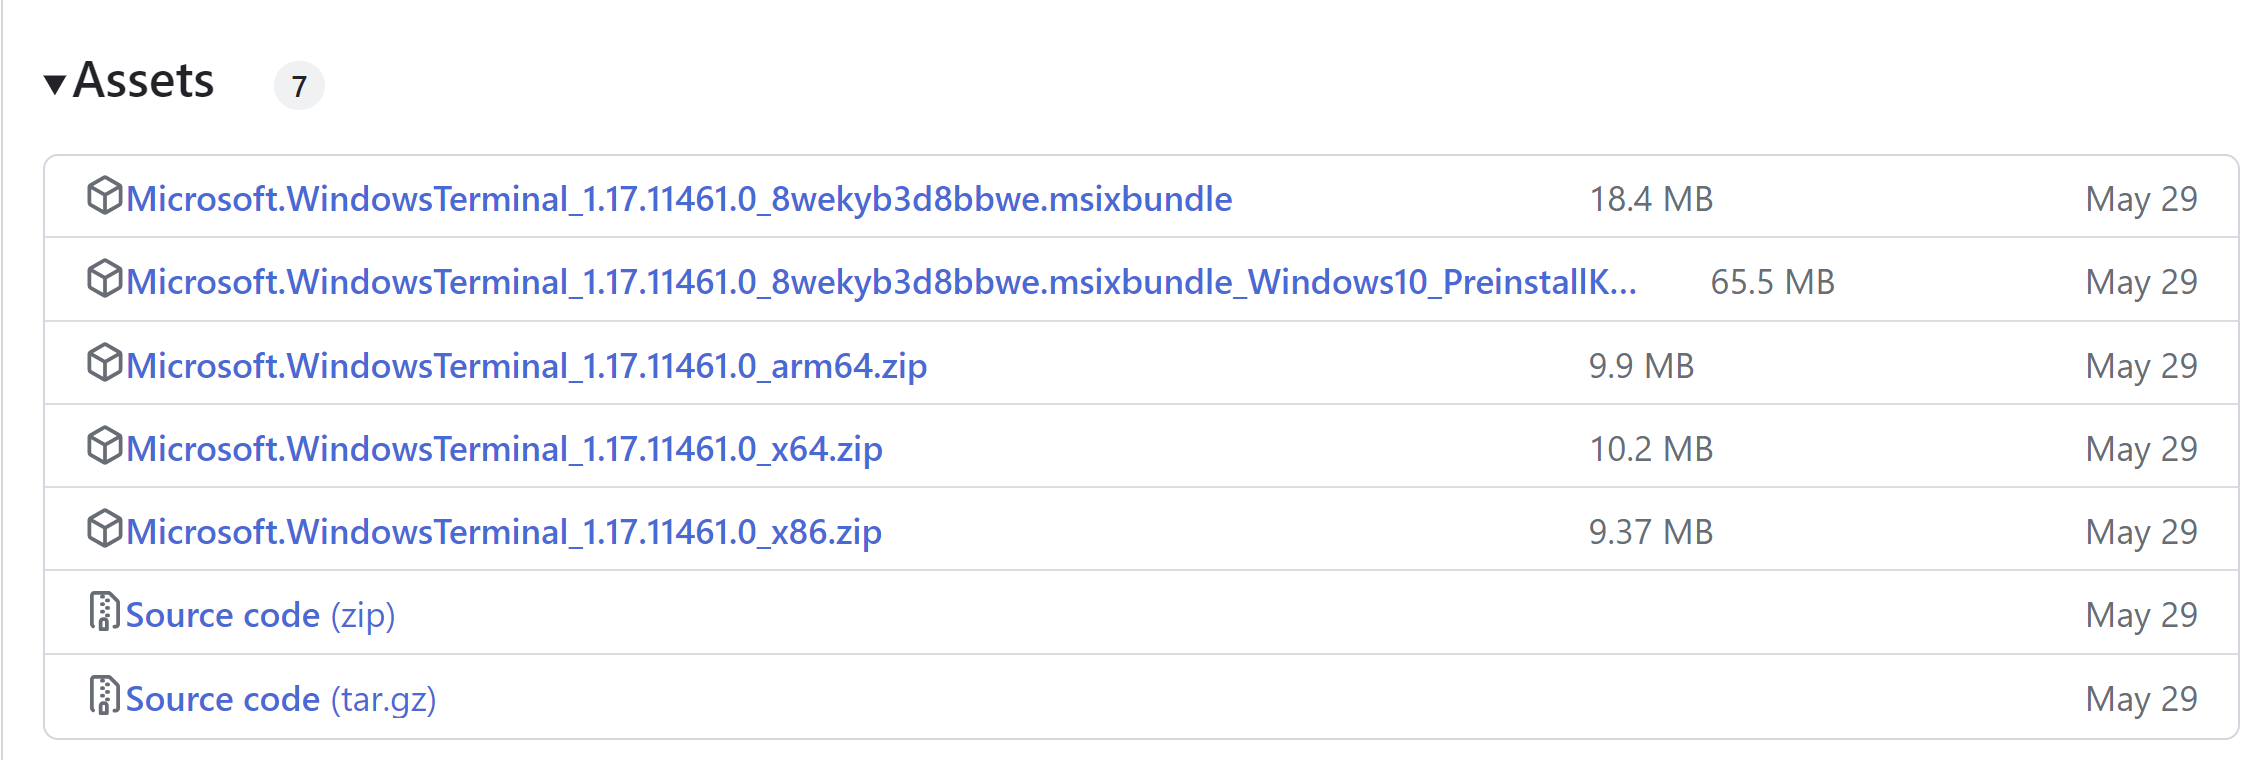
I was handed a laptop for a project that was Windows 10. Windows Terminal was not installed. On Windows 11 22H2, Windows Terminal is the default "command line experience" (see Windows Terminal is now the Default in Windows 11). Microsoft recommends installing Window Terminal using the Windows Store (see Windows Terminal). The laptop I was given was a corporate laptop and Windows Store was unavailable.

It is possible to download and install Windows Terminal from Windows Terminal Releases. Below are assets for Windows Terminal v1.17.11461.0:


The easiest way to install is to just download and invoke the MSIX bundle.


Sunday, August 13, 2023

PowerShell (failure): New-TemporaryFile Cannot Create a New Filename without Creating a File

In PowerShell the standard way to create a temporary filename is to invoke the System.IO namespace's Path class's GetTempFileName method. To be clear, only a filename is retrieved and no actual file is created. An example of GetTempFileName being invoked by PowerShell is as follows:

[string] $tempFilenameFromCsharp = ` 
               [System.IO.Path]::GetTempFileName() 

The results of the code above will vary because the filename is randomly generated and the method uses a user's environment variable, $env:TEMP. An example of the value assigned to $tempFilenameFromCsharp when the code snippet above being invoked is as follows:

C:\Users\jann\AppData\Local\Temp\tmpCF88.tmp

The New-TemporaryFile PowerShell cmdlet creatse a new temporary file and returns a corresponding instance of the System.IO.FileInfo class whihc include information such as the name of the file created.

My theory that I felt had a 20% chance of working: Invoke New-TemporaryFile with the -WhatIf command-line option and instead of creating a temporary file, the comdlet will return the name of the temporary file that would have been created.

For those that need a reminder, the WhatIf command-line option is defined as follows (see: WhatIf Switch):


My attempt to use New-TemporaryFile to create filename without creating a file was as follows:

[System.IO.FileInfo] $tempFilenameFromPowerShell = `
                         New-TemporaryFile -WhatIf -ErrorAction Stop

The output from invoking the above command is follows:


The following code tests if the $tempFilenameFromPowerShell variable is assigned to $null:


Since $tempFilenameFromPowerShell is set to $null so New-TemporaryFile combined with -WhatIf does not create a new filename. 

Not every idea we try works.

Saturday, July 29, 2023

PowerShell: azcopy Working Around the New Version Available Information Message

One of the most optimal ways to upload and download blobs to/from Azure storage containers is the azcopy utility (see azcopy). This utility can be used from the command-line or can be included in a PowerShell script such as the following:

[string] $azCopyPath = 'C:\bin\azcopy.exe'
[string] $blobSasUrl = 'put your own storage URL plus SAS token here'

& $azCopyPath list $blobSasUrl 

The above example is one of cases where azcopy is not used to upload or download files/folders/blobs. The "azcopy list" command will list the blobs for a given storage URL (see azcopy list).

The output from the above command is as follows:

INFO: azcopy.10_19_0.exe 10.19.0: A newer version 10.20.0 is available to download

INFO: a.txt;  Content Length: 1.20 KiB
INFO: b.txt;  Content Length: 1.20 KiB
INFO: c.txt;  Content Length: 1.20 KiB
INFO: d.txt;  Content Length: 1.20 KiB

The desired output is as follows (sans the upgrade available message):


The azcopy utility creates a message on the  information data stream that an upgrade is available. The output from azcopy list is also provided on the information data stream. There is no way to suppress the "newer version is available to download" message.

The following PowerShell code uses "Select-Object -Skip" (see Select-Object) to remove the upgrade informational message and returns only the data retrieved by azcopy list:

[string] $upgradeAvialableSuffix = 'is available to download'

function Get-AzCopyList {
    param(
        [Parameter(Mandatory=$true)]
        [string] $azCopyFilePath,
        [Parameter(Mandatory=$true)]
        [string] $blobUrlWithSasToken
        )

    [string[]] $results = & $azCopyPath list $blobSasUrl 

    # always return an array
    if (($null -eq $results) -or (0 -eq $results.Length)) {
        return ,[string[]]::new(0)
    }

    [int] $index = 0

    if ($results[0].EndsWith($upgradeAvialableSuffix)) {
        [bool] $endMarkerFound = $false

        foreach ($result in $results) {
            $index++
            if (0 -eq $result.Length) {
                $endMarkerFound = $true
                break
            }
        }

        if ($false -eq $endMarkerFound) {
            throw "Upgrade message not delineated from results $($result[0])"
        }
    }

    return $results | Select-Object -Skip $index 
}

[string] $azCopyPath = 'C:\bin\azcopy.exe'
[string] $blobSasUrl = 'put your own storage URL plus SAS token here'
[string[]] $results = Get-AzCopyList $azCopyPath $blobSasUrl

$results

The output from above code is:
INFO: a.txt;  Content Length: 1.20 KiB
INFO: b.txt;  Content Length: 1.20 KiB
INFO: c.txt;  Content Length: 1.20 KiB
INFO: d.txt;  Content Length: 1.20 KiB


Tuesday, July 4, 2023

Docker/Windows: Installation Requirement "BIOS-level Hardware Virtualization"

Installing/running Docker on Windows requires that WSL be installed (see Install Docker Desktop on Windows). According the aforementioned write up, WSL has the following hardware requirements:


While running Windows it is possible to check if hardware virtualization is enabled at the BIOS level. To check if this is enabled, launch Task Manager (Ctrl-Alt-Delete) and from Task Manager select the Performance blade:


Notice in the lower right corner there is a box high added to the screenshot showing Virtualization Enabled.

Wednesday, June 7, 2023

PowerShell: Installing the latest version of Pester

Before installing the latest version of Pester, uninstall the legacy version of Pester (Pester 3.x) which is installed with most modern versions of Windows (see PowerShell: Uninstalling Pester 3.0). On a machine with PowerShell 5.0 or later install, the latest version of Pester can be installed as follows without running as administrator:

Install-Module -Name Pester

Once install verify that version of Pester is the most recent:

(Get-Module -ListAvailable Pester).Version

An example of installing Pester is as follows (not that a user is prompted to accept the modules being installed):

E:\Users\Jann\PowerShellRepos> Install-Module -Name Pester

Untrusted repository

You are installing the modules from an untrusted repository. If you trust this repository, change its InstallationPolicy value by running the Set-PSRepository

cmdlet. Are you sure you want to install the modules from 'PSGallery'?

[Y] Yes  [A] Yes to All  [N] No  [L] No to All  [S] Suspend  [?] Help (default is "N"): A


Tuesday, June 6, 2023

PowerShell: Uninstalling Pester 3.0

Microsoft by default installs an obsolete version of Pester on Windows (Pester 3.x). For example on one of my machines (Windows 11) the version of Pester installed is 3.4.0 (2016 Pester). In fact, Pester 3.4.0 is installed for x64 and x86 (32-bit) versions of PowerShell. To uninstall Pester 3.4.0 means that the x64 and x86 installs have to be uninstalled.

Detecting the Available Versions of Pester Installed

The following PowerShell displays available versions of Pester installed:

(Get-Module -ListAvailable Pester).Version

The default version of Pester installed on my Windows 11 host is as follows:


Uninstalling Pester 3.x

The problem with Pester 3.x is that it installed as part the O.S. and it cannot be uninstalled with Uninstall-Module (this won't work: Uninstall-Module -Name Pester). The following script will understand all 3.x versions of Pester on a machine:

#Requires -RunAsAdministrator

function Uninstall-PesterInstance {
    param(
        [Parameter(mandatory=$true)]
        [string] $pesterFolderPath
    )    

    takeown /F $pesterFolderPath /A /R
    icacls $pesterFolderPath /reset
    # Grant permissions to group, Administrators, via SID.
    # This handles localiztion on non-U.S. Windows installations
    icacls $pesterFolderPath /grant "*S-1-5-32-544:F" /inheritance:d /T
    Remove-Item -Path $pesterFolderPath -Recurse -Force -Confirm:$false    
}

[string] $bitness32ProgramFiles = ${env:ProgramFiles(x86)}
[string] $bitness64ProgramFiles = $env:ProgramFiles
[string[]] $programFilePaths = $bitness32ProgramFiles, $bitness64ProgramFiles

foreach ($programFilePath in $programFilePaths) {
    [string] $pester3xFolderPath = "$programFilePath\WindowsPowerShell\Modules\Pester"

    if (Test-Path -Path $pester3xFolderPath -PathType Container) {        
        [System.IO.DirectoryInfo[]] $pesterDirectories =
           Get-ChildItem -Path $pester3xFolderPath -Filter '3.*'

        foreach ($pesterDirectory in $pesterDirectories) {
            Uninstall-PesterInstance $pesterDirectory.FullName
        }
    }
}

The first line of the above script uses "#Requires -RunAsAdministrator" to mandate the script runs with administrator credentials. Pester 3.x is installed for Windows and can only be uninstalled by an administrator (see PowerShell: Requiring a Script to Run as Administrator).

The code above is broken into a loop the iterate through all Pester 3.x version found in program files targeting x86 and x64 bit PowerShell:


For each instance of Pester 3.x install the Uninstall-PesterIntance method is invoked to physically delete the Pester 3.x folders recursively:


Monday, June 5, 2023

PowerShell: Requiring a Script to Run as Administrator

Placing the following at the top of a PowerShell script requires that said script to run as administrator:

#Requires -RunAsAdministrator

For example, Pester 3.x is installed with modern versions of Windows and only an administrator can uninstall this O.S. integrated version of Pester hence "#Requires -RunAsAdministrator" comes in handy.

The #Requires statement is documented by Microsoft at about_Requires and the comprehensive overview of #Requires provided by Microsoft's documentation is as follows:


Sunday, May 28, 2023

PowerShell: StringBuild AppendLine lessons from C

Two years ago I wrote a post, PowerShell: Inadvertently Returning Multiple Values from a Function and low and behold I found a found a common C# data type that is a common culprit of this issue, StringBuilder. I have coded C# for twenty-tree years and I did not realize the each Append* method of StringBuilder returns a reference to the StringBuilder.

To demonstrate consider this C# snippet:

var builder = new StringBuilder();

builder.AppendLine("Environment Properties:");
builder.AppendLine($"MachineName: {Environment.MachineName}");
builder.AppendLine($"UserName: {Environment.UserName}");
builder.AppendLine($"UserDomainName: {Environment.UserDomainName}");
builder.AppendLine($"OSVersion: {Environment.OSVersion}");
builder.AppendLine($"ProcessorCount: {Environment.ProcessorCount}");
builder.AppendLine(
  $"Is64BitOperatingSystem: {Environment.Is64BitOperatingSystem}");
builder.AppendLine(
  $"SystemDirectory: {Environment.SystemDirectory}");
builder.AppendLine($"CurrentDirectory: {Environment.CurrentDirectory}");

Console.Write(builder.ToString());

In the documentation for the AppendLine method, AppendLine(String), the return value of AppendLine and each Append* method of StringBuilder is defined as follows:


A clearer way to write the above code in C# would be acknowledge the return value and to ignore it:

var builder = new StringBuilder();

_ = builder.AppendLine("Environment Properties:");
_ = builder.AppendLine($"MachineName: {Environment.MachineName}");
_ = builder.AppendLine($"UserName: {Environment.UserName}");
_ = builder.AppendLine(
      $"UserDomainName: {Environment.UserDomainName}");
_ = builder.AppendLine($"OSVersion: {Environment.OSVersion}");
_ = builder.AppendLine(
      $"ProcessorCount: {Environment.ProcessorCount}");
_ = builder.AppendLine(
      $"Is64BitOperatingSystem: {Environment.Is64BitOperatingSystem}");
_ = builder.AppendLine(
      $"SystemDirectory: {Environment.SystemDirectory}");
_ = builder.AppendLine($"CurrentDirectory: {Environment.CurrentDirectory}");

Console.Write(builder.ToString());

The following code shows PowerShell invoking AppendLine multiple times:

function Get-EnvironmentProperties {
    [System.Text.StringBuilder] $builder = [System.Text.StringBuilder]::new()

    $builder.AppendLine("Environment Properties:")
    $builder.AppendLine("MachineName: " + [Environment]::MachineName)
    $builder.AppendLine("UserName: " + [Environment]::UserName)
    $builder.AppendLine("UserDomainName: " + [Environment]::UserDomainName)
    $builder.AppendLine("OSVersion: " + [Environment]::OSVersion)
    $builder.AppendLine("ProcessorCount: " + [Environment]::ProcessorCount)
    $builder.AppendLine("Is64BitOperatingSystem: " + [Environment]::Is64BitOperatingSystem)
    $builder.AppendLine("SystemDirectory: " + [Environment]::SystemDirectory)
    $builder.AppendLine("CurrentDirectory: " + [Environment]::CurrentDirectory)

    return $builder.ToString()
}

$result = Get-EnvironmentProperties

Although it appears that the PowerShell function, Get-EnvironmentProperties, returns a string. Result (the return value from Get-EnvironmentProperties) in an array of 10 elements:


The method AppendLine is invoked nine times so the first nine elements of the array. The tenth element of the array (index of 9) is the string return in the last line of function, Get-EnvironmentProperties.


Below show a variant of the EnvironmentProperties function suppresses the return value from StringBuilder's AppendLine:

function Get-EnvironmentProperties {
    [System.Text.StringBuilder] $builder = `
          [System.Text.StringBuilder]::new()

    $builder.AppendLine("Environment Properties:") | Out-Null
    [void]$builder.AppendLine("MachineName: " + 
              [Environment]::MachineName)
    $builder.AppendLine("UserName: " + 
              [Environment]::UserName) > $null
    $null = $builder.AppendLine("UserDomainName: " + 
              [Environment]::UserDomainName)

    return $builder.ToString()
}

Suppressing the StringBuilder returned by AppendLine results in the the correct behavior, the lone return value is as string as is show below:


A variety of mechanism were show to suppress return value of AppendLine. From the performance stand point, Out-Null is the slowest but from a readability stand point, it is the most readable for all levels of PowerShell developer.

In my code I used the following approach as I learned C as my first programming language:

    [void]$builder.AppendLine("MachineName: " + 
              [Environment]::MachineName)

With regard to performance and suppressing the result of a method/expression StackOverflow has an excellent post on the topic What's the better (cleaner) way to ignore output in PowerShell? A response by JasonMArcher demonstrates and Out-Null has the worst performance.


Monday, May 8, 2023

Visual Studio Code: Disable Format on Save per-File (including wildcards)

In this post, we'll explore how to disable the formatOnSave option for specific files, multiple files, using wild cards, and files with certain extensions.


Disabling formatOnSave for a specific file

To disable formatOnSave for a specific file, you can add the following setting to your settings.json file:

"[file path/filename.ext]": {
    "editor.formatOnSave": false
}

Replace file path/filename.ext (noted in boldface) with the path and filename of the file for which you want to disable formatOnSave.


Disabling formatOnSave for multiple files

To disable formatOnSave for multiple files, you can add the following setting to your settings.json file:

"editor.formatOnSave": true,
"[file path/filename1.ext]": {
    "editor.formatOnSave": false
},
"[file path/filename2.ext]": {
    "editor.formatOnSave": false
}

Replace file path/filename1.ext and file path/filename2.ext  (noted in boldface) with the path and filenames of the files for which you want to disable formatOnSave.


Disabling formatOnSave using wildcards

You can also disable formatOnSave for files that match a specific pattern using wildcards. For example, to disable formatOnSave for files that have a specific prefix, you can add the following setting to your settings.json file:

"editor.formatOnSave": true,
"[prefix]*.ext": {
    "editor.formatOnSave": false
}

Replace prefix  (noted in boldface) with the desired prefix for the files you want to exclude from formatOnSave.

Similarly, to disable formatOnSave for files that have multiple possible extensions, you can use a wildcard to match the extensions. For example:

"editor.formatOnSave": true,
"[file path/*.ext1, *.ext2]": {
    "editor.formatOnSave": false
}

Replace file path with the path to the directory containing the files you want to exclude from formatOnSave. Replace ext1 and ext2 with the extensions of the files you want to exclude from formatOnSave.

Conclusion

And that's it! With these settings, you can easily disable the formatOnSave option for specific files, multiple files, or using wildcards.

Sunday, May 7, 2023

Visual Studio Code: Disable Format on Save (settings.json: formatOnSave=true) per-File-Extension

I worked with two good engineers who loved auto format code (PowerShell) using Visual Studio Code's settings.json attribute. So I asked ChatGPT how to ignore the formatOnSave feature (trying out ChatGPT). Here is how to ignore Visual Studio Code's formatOnSave for a specific file extension. The steps to achieve presented.

If you want to exclude specific file types from being formatted on save, you need to configure Visual Studio Code to ignore those file extensions.

Step 1: Open the User Settings in VS Code

To configure the Format on Save feature, you need to edit the user settings in VS Code. To do this, open the Command Palette by pressing Ctrl+Shift+P (Windows) or Command+Shift+P (macOS), and type "Open User Settings". You should see "Preferences: Open User Settings" in the list of suggestions. Select it, and the settings.json file will open.

Step 2: Add the File Extensions to Ignore

In the settings.json file, you need to add the file extensions you want to exclude from the Format on Save feature. To do this, add the following code snippet:

"editor.formatOnSave": true,
"[md]": {
    "editor.formatOnSave": false
}

The code in boldface was added to the standard settings.json to ignore Markdown files. In this example, we're telling VS Code to enable the Format on Save feature globally ("editor.formatOnSave": true) and then disabling it for Markdown files ("[md]": {"editor.formatOnSave": false}).

Step 3: Save the User Settings

Once you've added the code snippet to the settings.json file, save the file, and you're done. The Format on Save feature will now be disabled for the file extension specified (the markdown extension, md).

Conclusion

In this blog post, we've seen how to configure Visual Studio Code to ignore specific file extensions when using the Format on Save feature. This can be useful if you want to exclude certain files from being automatically formatted when you save them. With just a few simple steps, you can customize this feature to suit your coding needs. 

Acknowledgments

I'd like to thank my high school typing teacher, Miss Joyce. I took one year of secretarial typing (on an IBM Selectric) and I type 120 WPM. I would like to think my mother for giving me the ability to write which I inherited from her. I would like that thank ChatGPT which wrote most of this blog. This is an experiment but ChatGPT is scary useful.

ChatGPT (writing PowerShell example) Will Replace Most of My Searches Targeting StackOverflow.com and Microsoft.com

The Old Way of Technical Search

The modus operandi I use for most of my software-development-related research is to:

  1. Search using Google (yes, I prefer the results to Bing).

  2. Search with keywords and typically target the site that will give me the best results using Google site keyword such as:

    2.1 Find the man page for PowerShell's Invoke-RestMethod cmdlet: Invoke-RestMethod site:microsoft.com. Note above the site: refers to microsoft.com.

    2.2 How to use PowerShell's Where-Object to select a value in an array of arrays: filter array of string arrays PowerShell Where-Object site:stackoverflow.com. Note above the site: refers to stackoverflow.com.

  3. Read through and click on the results. For Stack Overflow (I have loved Stack Overflow for the last fifteen years), this is tedious because a lot of results need to be culled to find an answer to your question.

ChatGPT: the New Way of Technical Search

As an experiment, I asked ChatGPT to help me with a piece of code (yes, I could have written this code without searching) but it is complex code. Here are the instructions I gave ChatGPT:

  • I want to have a PowerShell array of type [PSCustomObject[]] and each element of the array is type [PSCustomObject[]]. I want to select all values where index 4 equals 'monkey'.
  • I want to have a PowerShell array of type [PSCustomObject[]] and each element of the array is type [string[]]. I want to select all values where index 4 equals 'monkey'.
  • [string[]] $a = 'x', 'y', 'z'; [string[]] $b = 'e', 'f', 'g'; [string[]] $c = 'q', 'r', 's'; [PSCustomObject[]] $a, $b, $c. Select all values where array index 1 equals 'f'.
  • enum SegmentIndexes { Region Subregion State }. Select index [SegmentIndexes]::Region equals 'f'.

  • Use the array from the previous example. I am not interested in an array of enumerations.
  • Use the array before that.
  • Rewrite the code with no comments and please put the type in front of the declared variables
  • I did not ask you return $filterArray so the last line is not needed
  • Do not use a ; when populating the hashtable
  • You are incorrect. The ; are still used in the hashtable

Here is the code ChatGPT generated which is correct:

enum SegmentIndexes { Region Subregion State } [PSCustomObject[]]$array = @( @{ 'EmptySlot' = 'x' 'Region' = 'f' 'Division' = 'a' } @{ 'EmptySlot' = 'y' 'Region' = 'g' 'Division' = 'b' } @{ 'EmptySlot' = 'z' 'Region' = 'h' 'Division' = 'c' } ) $filteredArray = $array | Where-Object { $_[[SegmentIndexes]::Region] -eq 'f' }

Apology

Over the past few years, one of the best people I've worked with is Stephen Durant of Stack Overflow. He is a customer liaison to corporate users of Stack Overflow. I do not normally praise someone for doing their job, but Stephen is really elite at his work. So, Stephen, I apologize because ChatGPT has filled many more of my needs related to technical search.

Acknowledgments

This blog was proofed by ChatGPT.