I found myself in need of a proxy server for some development and Ubuntu was a logic choice. My MSDN subscription comes with a $150 Azure credit so this was the logical platform on which to create the virtual machine.
The first step in creating an Ubuntu Server on Azure is to login to the Azure portal (
https://portal.azure.com). Upon login, the Dashboard for Azure is shown (see below):
Select the +New button at the top left of the management portal (see below):
There is a search box at the top of the categories displayed when +New is clicked, In the search box type Ubuntu and click enter:
Clicking on enter to with ubuntu in the search box displays the following:
From the list of server options select the desired version by clicking on the name. For this project Ubuntu 17.04 was selected (note: the server cost will be selected later on in the process when the hardware is selected so don't worry about the cost just yet:
The previous screen allows a user to select between classic deployment and deployment using Resource Manager. This is basically say do you want to use the old way manage Azure resources (classic) or use the way everyone has moved to and Microsoft is advocating (Resource Manager). For this project, Resource Manager was selected. Once the desired value is selected click on Create:
\
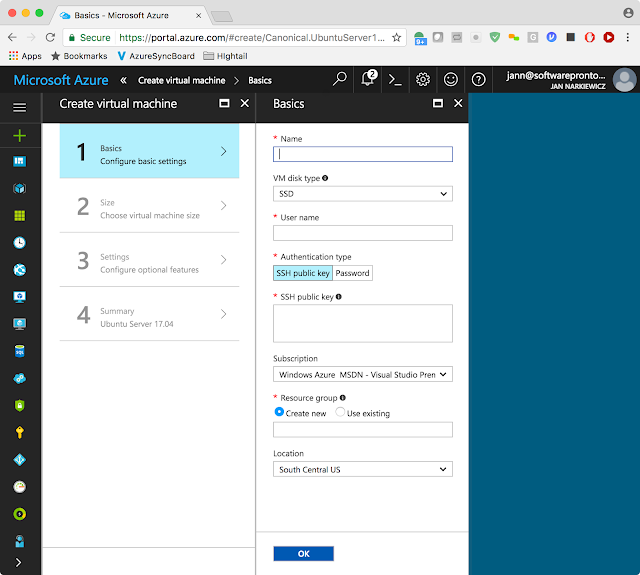
The previous screen allows the core information for the virtual machine to be specified (machine name, administrator name, password or key-based authentication, SSD or HDD drives, etc.). Below the information for this example is filled in:
Azure will warn of any mistakes, for example the user name must be in a lower case. I picked West US 2 because I'm in the Silicon Valley (which is western U.S.). Once the values are set click on OK which displays a choice of hardware and corresponding costs as follows:
The project this machine is being created for is to develop a client capable of going through a proxy. To run a proxy a A1 Standard ($37.94 a month) is fine which is well within my $150 Azure credit provided by MSDN. Notice to right of the above the screen the "View all" link. Microsoft has some monstrous machines. Once a machine is clicked on (selected) click on the Select button:
The previous screen allows storage, networking and various sundries to be set for the virtual machine. The defaults are acceptable so click on OK:
After clicking OK on the screen above, Azure will be the task of deploying the new virtual machine. In the previous screen the alert icon (the bell) contained a 2 indicating two alerts. After clicking on OK the alert icon contains a 3 indicating three alerts:
In order to see the alerts click on the alert icon (on the upper right side of the portal). Once clicked on the Alert icon will display notifications such as following:
Notice the first notification reads "Deployment in progress." This means the virtual machine is being deployed a process which can take several minutes.
Connecting to the Virtual Machine
Part of the deployment process performed by Azure is allocating an IP address for the virtual machine. One the virtual machine is deployed that the IP address can be determined by navigating to the management screen for the virtual machines. This is achieved by selecting "Virtual machines" from the Azure portal:
Selecting the "Virtual machines" link displays the "Virtual machines" blade (shown below):
To view the IP address and manage a virtual machine select the machine by name from the "Virtual machines" blade. The Ubuntu server created previously was named MugundaProxy so select the MugundaProxy link in the previous screen. Selecting a specif virtual machine display a screen such as the following:
The IP address for the MugundaProxy, Virtual Machine, is list in the right column of information of the previous screen. A closer look at the is section of the screen shows the IP address as follows:
The IP address above will be used with SSH in order to access the virtual machine.
Accessing the machine via SSH on Linux or OS/X
Any Linux or OS/X terminal can access SSH directly so logging into the virtual machine is a matter specifying the username and password created with the virtual machine. The format of SSH is as follows:
SSH <username>@<ipaddress/hostname>
The following shows invoking SSH against our server (note the server was restarted so the IP differs from above)
When enter is hit a prompt is given for the password:
After entering a correct password we can access our newly provisioned Ubuntu server:
Accessing the machine via Windows
Windows does not have a native SSH client. To access the virtual machine from Windows, download Putty (
http://www.putty.org/). PuTTY is an open source SSH and telnet client. Installing and using Putty is the subject of a future blog.
FYI by default only port 22 is open for Inbound Connections
Recall that this virtual machine is going to be used as a proxy server. This means that clients accessing the proxy will have to use a specific port. SSH uses port 22 and SSH was shown to allow access to the virtual machine. As it turns out, by default only port 22 is open for Inbound connections. Developers looking to open access to any other ports (like old favorites 20, 21, 25, 80, 443, etc.) will have to use the Azure portal (
https://portal.azure.com) in order to configure additional inbound ports for the virtual machine. This is the subject of a future blog.


