Monday, July 3, 2017

Setting up a proxy server with TinyProxy on Ubuntu

Introduction

This article demonstrates how to setup a TinyProxy proxy server on Ubuntu. The purposes of this proxy instance is to test client code targeting accessing web service via proxies and reading PAC file. The steps we took to get get to get to this point (the TinyProxy installer) are as follows (previous blog postings):

Setup and Configuration

1) To install, access the server on which tinyproxy is to be installed via ssh.
2) Execute the following command on the Ubuntu server via the terminal window:

sudo apt-get install tinyproxy

During install the terminal will generate output such as:


3) By invoking the following from the terminal we can determine current status of the newly installed tinyproxy:

service tinyproxy status

Invoking the previous command generates output such as the following:


From the previous screen we can see that the tinyproxy service is "active {running}" and is running as PID 71258.

4) To exit the status information simply type:
q

5) We need to change the configuration which is stored in a simple text file. In order to update the configuration file, the tinyproxy service must be stopped by invoking:

service tinyproxy stop

The output generated by this command is as follows:


6) To modify the configuration file associated with tinyprox, navigate to to /var/tiny/proxy

The ls invoked in the /etc/tinyproxy directory shows the configuration file for the service, tinyproxy.config.

7) Open tinyproxy.conf using vim (or editor of your choice) prefixed by sudo (only an administrator can edit the configuration file):
sudo vim tinyproxy.conf

The default contents of the the tinyproxy.cong file is as follows displayed in vim:


Notice above that the port for tinyproxy is set by default to 8888. Recall that the port we opened to access the Ubuntu server was 21777.

8) Delete the 8888 after the Port keyword and replace with a value of 21777:


9) Keep tinyproxy.config open in the editor because we need to modify the permission of our proxy server to allow any host to access tinyproxy.
10) Navigate down the configuration file util the "authorization controls" section has been reached.

Notice in the configuration file tinyproxy, tinyproxy.conf, that access is allowed to local host (IP address 127.0.0.1):


Place a # in front of the "Allow 127.0.0.1" line.:

There are now no explicit hosts permitted to access the tinyproxy instance. This means "allow access sne". This includes protocols HTTP and HTTPS.

12) Save the configuration file, tinyproxy.conf.
13) From the terminal invoke the following command to restart the tinyproxy service:
service start tinyproxy

The output generated by invoking this command is as follows:


Notice above that the user (administrator) credentials were required to be entered before the tinyproxy service started.

Verify Proxy is working using Extension Proxy SwitchyOmega

On a Windows system, the proxy settings can be se specified under Internet Explorer options. Using Chrome in conjunction with the Proxy SwitchyOmega allows extremely extensive proxy management.

To find the exertion for Chrome simply look up Proxy SwiticyOmega in any search engine. On google, the search term leads to the following screen:


The upper right corner of the web page contains a rather appropriate button:

Clicking on the "ADD TO CHROME" button disdfsplays the following:


From the previous dialog click on "Add extension":


When the Proxy SwitchyOmega extension is installed a series of tutorial screens are displayed (meaning you click on Next a lot). To break out of the tutorial wizard click on the X at the top right of the dialog.

Below notice that the extensions bar is displayed. The extension to the far right, marked by an icon that is a circle, is Proxy SwitchyOmega. Clicking on the circle icon displays the following:


At the bottom of the Proxy SwitchyOmega menu displayed above is the the Options menu item. Selecting on the Options menu items displays the following:

The previous screen allows the options to be managed for a proxy named, "proxy." To see more options selected "Show Advanced" which displays the following; 


The IP address for the new installed tinyproxy service is 52.191.142.196. Using the advanced options below the server (52.191.142.196) and port (21777) can be assigned to both the HTTP and HTTPS protocols:


On the lower left is in the "Apply changes" option:


Click on "Apply changes" means the Tinyproxy proxy, is ready to us. Clicking on the extension icon the proxy options menu can be displayed for TwitchyOmega:


The menu items above includes "proxy." Recall that the configuration setup to point the tinyproxy proxy was named "proxy." By selecting the proxy named "proxy" TwitchyOmega will point all Chrome traffic for HTTP and HTTPS at the proxy server just configured. 

Why not squid?

In addition to tinyproxy, the squid proxy, was researched as a potential proxy to setup. The proxy installed was not for a production environment. The proxy was to be used for development against HTTPS-based REST services. The reason tinyproxy was selected over squid, because tinyproxy was simpler to configure.

Wednesday, June 28, 2017

PuTTY a telnet/SSH client for Windows (a.k.a how to access that Linux VM we just created from Windows)

Any OS/X, Linux or Unix system contains SSH which allows access to a remote system. Windows on the other hand does not support this natively which is where PuTTY comes in, a telnet/SSH client that runes on Windows. The download for PutTTY can be found at http://www.putty.org/.


From PuTTY's home page (above) it should be clear where to click to download "You can download PuTTY her." Navigating to the download page from the main page displays:


Those still using 32-bit Windows are getting rarer. Since I am using 64-bit Windows so I click on the putty-64bit-0.69-installer.msi link:


Save the MSI and then run it to install PuTTY:


Click "Run" to run the installer:


As in the case with any installer keep clicking the "Next" button:


Click "Next" unless you want to go rogue and change the default install location:


Pick the desired features and then click "Install:"


The status screen will churn away while PuTTY installs (hence Next is not enabled). Once install finishes the following is displayed:


On the final screen click "Finish."

Run PuTTY as you would any Windows application:


Under Port in the PuTTY screen the value is set to 22, the default for port for SSH. To access a machine such as our Ubuntu Virtual machine from Opening an inbound port for an Ubuntu Virtual Machine on Azure enter the machine IP address in the "Host Name (or IP address):"


Click on Open to access the machine specified which displays the following screen:


Enter the username and password for the remote host:


Click Enter and the user name and password will be used to authenticate SSH access to the host:


A Windows user now has access to a remote server.


Tuesday, June 27, 2017

Opening an inbound port for an Ubuntu Virtual Machine on Azure

In the post, "Creating an Ubuntu Server on Azure," an Ubuntu virtual machine (VM) was setup on Azure. The purpose of this machine was to expose a proxy server that will ultimately run on port 21777. The problem to be solved is that by default the only inbound port open on an Ubuntu virtual machine on Azure is port 22 -- SSH (Secure Shell). The proxy server to be configured will be listening on port 21777 which is not open.

To open the port sign to the Azure port and navigate to the blade used the manage the Ubuntu virtual machine:


The left hand tab contains a set of options including "Network interfaces" (see below):


Click on "Network interfaces" which displays a list IP address for the VM:


Clicking on the lone network interface listed in the table above navigates to a screen that is used to manage said network interface:


Along the tabs on the left is an entry named "Network security group:"


Clicking on "Network security group" displays the following blade:


From the list of one network security group, select the link associated wth the lone security group:


From the tabs along the left size under "SETTINGS" is an entry "Inbound security rules:"


Click on "Inbound security rules" which displays the following:


Along the top of the screen listing inbound security rules is an +Add button:


Click on the +Add button:


For name we entered TinyProxyAccess which is a hint, the proxy server we are going to setup is TinyProxy. Under "Port range" 21777 is entered as TinyProxy will be listening to a range of one ports, 21777. Once the desired information is set, click on "OK:"

The new inbound security role takes several seconds to create by one created it will be listed along with the rule associated with port 22:


The inbound port, 21777, to be used by TinyProxy, is not open.

Sunday, June 25, 2017

Creating an Ubuntu Server on Azure

I found myself in need of a proxy server for some development and Ubuntu was a logic choice. My MSDN subscription comes with a $150 Azure credit so this was the logical platform on which to create the virtual machine.

The first step in creating an Ubuntu Server on Azure is to login to the Azure portal (https://portal.azure.com). Upon login, the Dashboard for Azure is shown (see below):


Select the +New button at the top left of the management portal (see below):


There is a search box at the top of the categories displayed when +New is clicked,  In the search box type Ubuntu and click enter:


Clicking on enter to with ubuntu in the search box displays the following:


From the list of server options select the desired version by clicking on the name. For this project Ubuntu 17.04 was selected (note: the server cost will be selected later on in the process when the hardware is selected so don't worry about the cost just yet:


The previous screen allows a user to select between classic deployment and deployment using Resource Manager. This is basically say do you want to use the old way manage Azure resources (classic) or use the way everyone has moved to and Microsoft is advocating (Resource Manager). For this project, Resource Manager was selected. Once the desired value is selected click on Create:

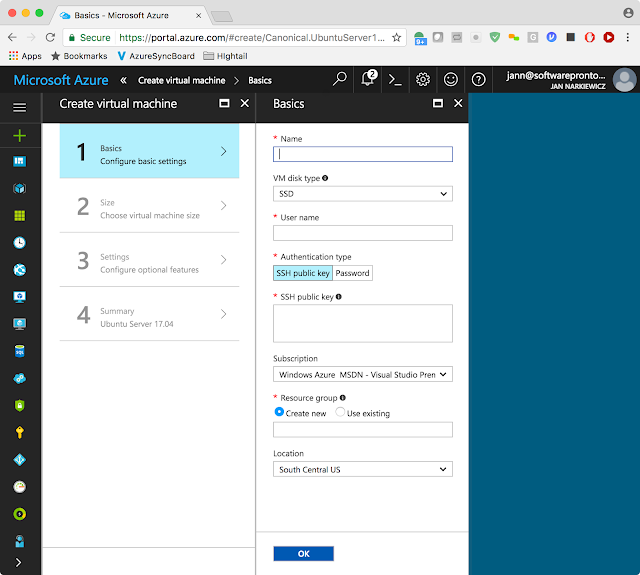
\

The previous screen allows the core information for the virtual machine to be specified (machine name, administrator name, password or key-based authentication,  SSD or HDD drives, etc.). Below the information for this example is filled in:


Azure will warn of any mistakes, for example the user name must be in a lower case. I picked West US 2 because I'm in the Silicon Valley (which is western U.S.). Once the values are set click on OK which displays a choice of hardware and corresponding costs as follows:


The project this machine is being created for is to develop a client capable of going through a proxy. To run a proxy a A1 Standard ($37.94 a month) is fine which is well within my $150 Azure credit provided by MSDN. Notice to right of the above the screen the "View all" link. Microsoft has some monstrous machines. Once a machine is clicked on (selected) click on the Select button:


The previous screen allows storage, networking and various sundries to be set for the virtual machine. The defaults are acceptable so click on OK:


After clicking OK on the screen above, Azure will be the task of deploying the new virtual machine. In the previous screen the alert icon (the bell) contained a 2 indicating two alerts. After clicking on OK the alert icon contains a 3 indicating three alerts:


In order to see the alerts click on the alert icon (on the upper right side of the portal). Once clicked on the Alert icon will display notifications such as following:


Notice the first notification reads "Deployment in progress." This means the virtual machine is being deployed a process which can take several minutes.

Connecting to the Virtual Machine

Part of the deployment process performed by Azure is allocating an IP address for the virtual machine. One the virtual machine is deployed that the IP address can be determined by navigating to the management screen for the virtual machines. This is achieved by selecting "Virtual machines" from the Azure portal:


Selecting the "Virtual machines" link displays the "Virtual machines" blade (shown below):


To view the IP address and manage a virtual machine select the machine by name from the "Virtual machines" blade. The Ubuntu server created previously was named MugundaProxy so select the MugundaProxy link in the previous screen. Selecting a specif virtual machine display a screen such as the following:


The IP address for the MugundaProxy, Virtual Machine, is list in the right column of information of the previous screen. A closer look at the is section of the screen shows the IP address as follows:


The IP address above will be used with SSH in order to access the virtual machine.

Accessing the machine via SSH on Linux or OS/X

Any Linux or OS/X terminal can access SSH directly so logging into the virtual machine is a matter specifying the username and password created with the virtual machine.  The format of SSH is as follows:
SSH <username>@<ipaddress/hostname>

The following shows invoking SSH against our server (note the server was restarted so the IP differs from above)

When enter is hit a prompt is given for the password:

 After entering a correct password we can access our newly provisioned Ubuntu server:

Accessing the machine via Windows

Windows does not have a native SSH client. To access the virtual machine from Windows, download Putty (http://www.putty.org/). PuTTY is an open source SSH and telnet client. Installing and using Putty is the subject of a future blog. 

FYI by default only port 22 is open for Inbound Connections

Recall that this virtual machine is going to be used as a proxy server. This means that clients accessing the proxy will have to use a specific port. SSH uses port 22 and SSH was shown to allow access to the virtual machine. As it turns out, by default only port 22 is open for Inbound connections. Developers looking to open access to any other ports (like old favorites 20, 21, 25, 80, 443, etc.) will have to use the Azure portal (https://portal.azure.com) in order to configure additional inbound ports for the virtual machine. This is the subject of a future blog.

Tuesday, October 4, 2016

Azure: Web App Environment Variables

This posting will present a class that can be used to retrieve the environment variables associated with an Azure Web Application. A complete list of the pertinent environment variables for an Azure Web App can be found at Azure runtime environment | Environment | Website Environment Variables. An example of the environment variables associated with an Azure Web App are as follows

WEBSITE_SITE_NAME: SWPBlogAnotherWebApp01
WEBSITE_SKU: Shared
WEBSITE_COMPUTE_MODE: Shared
WEBSITE_INSTANCE_ID: Shared
WEBSITE_NODE_DEFAULT_VERSION: 4.4.7
WEBSOCKET_CONCURRENT_REQUEST_LIMIT: 35

The specific environment variable I was interested in was WEBSITE_SITE_NAME. The web site name was need in order to write a piece of code that read the web site's application log. For this particular web application the application log was written to a storage container of type blob (see below):


Navigating to the specific blob containing shows the following


Notice above that the blob container contains a folder with the same name as the Web App. The application log for the Web App, SWPBlogAnotherWebApp01, is contained in the folder of the same name. So in order to write code that read the logs for an Azure Web App, the underlying code needs to know the name of the Web App, e.g.:

string websiteName = 
           Environment.GetEnvironmentVariable("WEBSITE_SITE_NAME");

A class the reads all the environment variables discussed is as follows:

using System;
using System.Linq;
using System.Text;
using System.Collections.Generic;

using static System.Environment;

namespace SoftwarePronto.Azure.Utility.Master
{
    /*
     * https://github.com/projectkudu/kudu/wiki/Azure-runtime-environment
     * WEBSITE_SITE_NAME - The name of the site.
     * WEBSITE_SKU - The sku of the site 
     *   (Possible values: Free, Shared, Basic, Standard).
     * WEBSITE_COMPUTE_MODE - Specifies whether website is on a dedicated
     *   or shared VM/s (Possible values: Shared, Dedicated).
     * WEBSITE_HOSTNAME - The Azure Website's primary host name for the 
     *   site (For example: site.azurewebsites.net). Note that 
     *   custom hostnames are not accounted for here.
     * WEBSITE_INSTANCE_ID - The id representing the VM that the site 
     *   is running on (If site runs on multiple instances, 
     *   each instance will have a different id).
     * WEBSITE_NODE_DEFAULT_VERSION - The default node version this 
     *   website is using.
     * WEBSOCKET_CONCURRENT_REQUEST_LIMIT - The limit for websocket's 
     *   concurrent requests.
     */
    public static class WebAppEnviroment
    {
      public static string _envNameWEBSITE_SITE_NAME = 
        "WEBSITE_SITE_NAME";

      public static string _envNameWEBSITE_SKU = "WEBSITE_SKU";

      public static string _envNameWEBSITE_COMPUTE_MODE = 
        "WEBSITE_COMPUTE_MODE";

      public static string _envNameWEBSITE_INSTANCE_ID = 
        "WEBSITE_INSTANCE_ID";

      public static string _envNameWEBSITE_NODE_DEFAULT_VERSION = 
        "WEBSITE_NODE_DEFAULT_VERSION";

      public static string _envNameWEBSOCKET_CONCURRENT_REQUEST_LIMIT = 
        "WEBSOCKET_CONCURRENT_REQUEST_LIMIT";

      public static string WebSiteName =>
            GetEnvironmentVariable(_envNameWEBSITE_SITE_NAME);

      public static string WebSKU =>
            GetEnvironmentVariable(_envNameWEBSITE_SKU);

      public static string WebSitComputeMode =>
            GetEnvironmentVariable(_envNameWEBSITE_COMPUTE_MODE);

      public static string WebSiteInstanceId =>
            GetEnvironmentVariable(_envNameWEBSITE_INSTANCE_ID);

      public static string WebSiteNodeDefaultVersion =>
            GetEnvironmentVariable(_envNameWEBSITE_NODE_DEFAULT_VERSION);

      public static string WebSiteSocketConcurrentRequestLimit =>
            GetEnvironmentVariable(
              _envNameWEBSOCKET_CONCURRENT_REQUEST_LIMIT);

      public static Dictionary<string, string> Get() =>
        new Dictionary<string, string>
        {
          [_envNameWEBSITE_SITE_NAME] = WebSiteName,
          [_envNameWEBSITE_SKU] = WebSKU,
          [_envNameWEBSITE_COMPUTE_MODE] = WebSitComputeMode,
          [_envNameWEBSITE_INSTANCE_ID] = WebSitComputeMode,
          [_envNameWEBSITE_NODE_DEFAULT_VERSION] = 
                              WebSiteNodeDefaultVersion,
          [_envNameWEBSOCKET_CONCURRENT_REQUEST_LIMIT] = 
                   WebSiteSocketConcurrentRequestLimit
        };

      public static string GetAsText()
      {
        StringBuilder result = new StringBuilder();

        Get().ToList().ForEach(wsv =>
           result.AppendLine($"{wsv.Key}: {wsv.Value ?? String.Empty}"));

        return result.ToString();
      }
    }
 }

The source code can be found in github.com:
https://github.com/softwarepronto/Blog

The solution can be found in the SoftwarePronto.Azure.Utility.Master folder.