Sunday, April 5, 2020

PowerShell: Comparing Version Numbers

Comparing applciation version number in PowerShell would come in handy when Selenium is used to automate Chrome. The version of Selenium which allows Chrome to be automated is dependent on the version of Chrome installed on a give host (see PowerShell: Geting Chrome's Version Number). By using Chrome's version number, it would be possible for PowerShell to load at runtime the correct version of Selenium to allow the particular version of Chrome to be automated.

Comparing Versions

When thought of as version numbers 1.0.100 is a newer version than 1.0.99 but below the are compared as strings:

[string] $versionPrevious = '1.0.99'
[string] $versionCurrent = '1.0.100'


if ($versionCurrent -gt $versionPrevious) {
    Write-Host 
      "Correct: `$versionCurrent ($versionCurrent) -gt" + 
      "`$versionPrevious ($versionPrevious)"
}

else {
    Write-Host 
      "Incorrect: `$versionPrevious ($versionPrevious) -gt" +
      " `$versionCurrent ($versionCurrent)"
}

The output from the previous code is as expected the result of a string compare using the -gt operator which is not the same a comparison between version numbers:

Incorrect: $versionPrevious (1.0.99) -gt $versionCurrent (1.0.100)
.NET provides a class System.Version for representing version numbers. In PowerShell this calls is presented by the type [version]. The System.NET version type is described by Microsoft in https://docs.microsoft.com/ as follows:


Changing the variable type from [string] to [version] results in the version numbers be compared correctly:

[version] $versionPrevious = '1.0.99'
[version] $versionCurrent = '1.0.100'

if ($versionCurrent -gt $versionPrevious) {
    Write-Host 
      "Correct: `$versionCurrent ($versionCurrent) -gt" + 
      "`$versionPrevious ($versionPrevious)"
}


else {
    Write-Host 
      "Incorrect: `$versionPrevious ($versionPrevious) -gt" +
      " `$versionCurrent ($versionCurrent)"
}


The output from the previous code is as expected the result of a version using the -gt operator:

Correct: $versionCurrent (1.0.100) -gt $versionPrevious (1.0.99)

A final note, the Escape Character

The previous code snippet contained two instance of the back quote character being used to suppress the $ character's use in a double quoted string `$versionCurrent and `$versionCurrent. A PowerShell variable inside of a double quoted string is results in the value of the variable being replaced inside the string. The back quote before $ suppresses this substitution




Saturday, April 4, 2020

PowerShell: Getting Chrome's Version Number

As part of some DevOps work I have been performing automations using Selenium driven by PowerShell (more on that later). In order to automate a browser such as Chrome is it is handy to know what version Chrome is installed on a give machine.

The code required is fairly straight forward as shown by ChromeSupport.psm1:

class ChromeSupport {
    hidden static [string] $Key =
        'HKLM:\SOFTWARE\Microsoft\Windows\' +
        'CurrentVersion\App Paths\chrome.exe'


    static [System.Diagnostics.FileVersionInfo] GetVersionInfo() {
        [string] $path = 

          (Get-ItemProperty ([ChromeSupport]::Key)).'(Default)'

        return (Get-Item $path).VersionInfo
    }

}


The moduel is invoked from Powershell script, AutomationDriver.ps1:

using module '.\ChromeSupport.psm1'

[ChromeSupport]::GetVersionInfo()

The output from the above script is as follows:


Getting the product version is as matter of invoking the code as follows:

using module '.\ChromeSupport.psm1'

[ChromeSupport]::GetVersionInfo().ProductVersion

The previous code displays:


Tuesday, December 31, 2019

AWS/DevOps: Generate a key pair with AWS Console for an EC2 Instance

Creating a key pair to assign to an AWS EC2 instance using AWS's Console is trivial. Why discuss such a task? I have a problem. I inherited an EC2 instance and the existing key is with a guy on vacation and offline. I am concerned that DevOps infrastructure exists the uses the key to access the existing EC2 instance so swapping keys is not an option. The solution is to clone the EC2 instance and assign the clone a known key pair, hence the need to create a new key.

Do not lose the key pair they can only be downloaded once. Do not entrust the key pair to a guy going skiing in a remote mountain resort with no cell phone connectivity. 

Generating a key pair with AWS Console for an EC2 instance is performed as follows:


1. Login to the AWS Console:
https://console.aws.amazon.com/

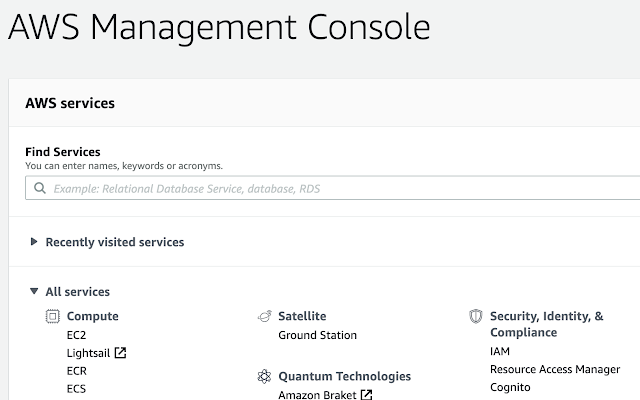
2. From the console, select EC2 (make sure the region is set correctly which for my project is US East (N. Virginia) us-east-1 to display the EC2 dashboard. You could search for EC2 but AWS puts EC2 top left under All services | Compute:


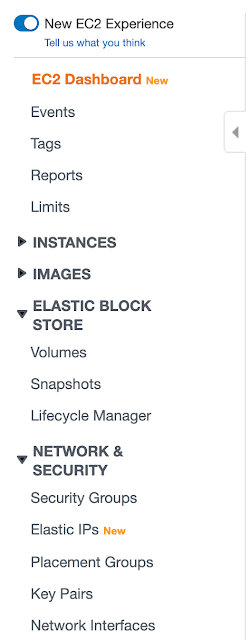
3. The left side of the EC2 Dashboard is as follows where key pairs can be managed and created using Network & Security | Key Pairs:


4. Click on Key Pairs reveals the following so to create the key pair click on Create Key Pair::


5. The Create Key Pair dialog is as follows and enter the name of the key pair to create with for this project is Passepartout paying homage to world traveler Jean Passepartout:


6. Click on the Create button to create the key pair. This will prompt the user to provided a save location:


The standard disclaimer applies: Do not lose the key pair they can only be downloaded once. 


Saturday, December 28, 2019

AWS/DevOps: Getting the Security Group of EC2 Instance using the AWS Console

Getting the security group assigned to an AWS EC2 instance using AWS's Console is trivial. Why discuss such a task? I have a problem. I inherited an EC2 instance and the existing key is with a guy on vacation and offline  I am concerned that DevOps infrastructure exists the uses the key to access the original EC2 instance so swapping keys is not an option. The solution is to clone the EC2 instance and assign the clone a known key pair using the same security group of the existing EC2 instance, hence the need to know an EC2 instance's security group.

Getting the security group for an EC2 instance is performed as follows:

1. Login to the AWS Console:
https://console.aws.amazon.com/

2. From the console, select EC2 (make sure the region is set correctly which for my project is US East (N. Virginia) us-east-1. You could search for EC2 but AWS puts EC2 top left under All services | Compute:


3. From the EC2 Resources select Running Instances (upper left):


4.From the list of EC2 images, click the checkbox of the EC2 instance for which the security group needs to recorded:


5. The security group can be seen in the Description tab under the selected EC2 instance:


Tuesday, December 24, 2019

OS/X: setting the default version of Java used

When developing a project it is often convenient to have a specific version of Java associated with JAVA_HOME and to have this version assignment made each time a terminal window is run,.

Setting JAVA_HOME to allow Java development  is not always about the latest and greatest version of Java. One of my current projects is Java 1.8. To configure my Mac accordingly, the first step was to determine  which version or versions of Java were installed.

To do this run a terminal window and from the prompt type:
/usr/libexec/java_home -V

This displays the version of Java available on a Mac:


Version 12.0 was the native version of Java on the Mac and version 1.8, had been installed later. Using Vim, create a .bash_profile file if it does not exist. If this file exists, edit the .bash_profile file. When using Vim to edit, use sudo to insure that the created./edit .bash_profile file can be saved:
sudo vim .bash_profile

The following line needs to be included in .bash_profile in order for version 1.8 to be the default version supported on the machine:
export JAVA_HOME=`/usr/libexec/java_home -v 1.8`

An example of .bash_profile being edit in VIM is as follows:


Close and save VIM once the change is made to .bash_profile. For the case of creating .bash_profile make sure that this file can be run as an executable:
sudo chmod +x .bash_profile

The sudo command is used before chmod to insure that the appropriate rights available to permit chmod +x being applied to .bash_profile.'

Assign JAVA_HOME using the following from terminal window:
export JAVA_HOME=`/usr/libexec/java_home -v 1.8`

If .bash_profile is a single line containing "export JAVA_HOME" the commands (or command) in the .bash_profile file can be invoked using:
source .bash_profile

Close the current terminal window and open a new terminal window. In the new terminal window run:
java -version

When the terminal window was created, .bash_profile should have been invoked so it should be no surprise that "java -version" displays the following:


Sunday, December 16, 2018

Git: Alternate Credentials in Azure DevOps (a.k.a. how not login with your email and Microsoft password)

Microsoft provides multiple types of Git repositories, Azure DevOps (formally known as TFS and Visual Studio Online) and GitHub. When accessing Git hosted on Azure DevOps, using email and password associated with your Microsoft account is sheer security folly. These credentials can log in to machines, access email, access MSDN benefits, access Azure, etc.

There is a simple solution to using the primary credentials (email/password), alternative credentials. At a high level, this just means that you can create username and password to use with an Azure DevOps Git repository and these are the credentials used to access Git. Alternative credentials are created by clicking on the user profile icon (see the JN in the upper-right below):


From the menu displayed by clicking on the user profile icon select the Security menu item:


When the Security menu item is selected, the User settings submenu is displayed;


From the User settings submenu select, Alternative credentials:


From the Alternative credentials panel, check the checkbox labeled Enable alternate authentication credentials.


Above a user named, redsox, was entered. Once Save is clicked an alternate username and password for accessing the Azure DevOps hosted Git repository is available. This username and password can be used as credentials for accessing any Git repositories associated with this Azure DevOps host Git repository. 

Thursday, December 13, 2018

Git on OS/X in Visual Studio Code

Getting Git to work with Visual Studio Code on OS/X takes a bit of finagling If interested, read on.

Install Git

OS/X has Git installed by default so there is no requirement to install Git in order to support integration with Visual Studio Code. To verify Git, from Visual Studio Code's View menu select Terminal:


In the Terminal window, type git --version and hit return:


The version git in the example above is 2.17.2. If Git is not found or if there is an error in configuration Git with Visual Studio Code, install the latest version of Git.

Azure DevOps Git: Setting up Alternate Credentials

A Git repository hosted in Azure DevOps is accessed via the web using a Microsoft ID (email) and password. Using these credentials with Git commands is an incredible security vulnerability. One workaround is to create alternate credentials for accessing a Git repository hosted in Azure DevOps Creating such credentials is discussed in: Git: Alternate Credentials in Azure DevOps (a.k.a. 

Determine the Repository to be Cloned

Git comes in many flavors Github (owned by Microsoft), BitBucket (owned by Atlassian) and Azure DevOps (owned by Microsoft). Below is an example of a Microsoft Azre DevOps repository (<vanity name>.visualstudio.com) and note that the Repos tab is selected on the left side:


Most flavors of Git place a clone button on their website. The Clone button is on the upper right above and clicking on it displays the following:


The URL to clone can be copied by clicking on the copy button to the right:
Notice also there is a button, Clone in VS Code.

Cloning via the Clone in VS Code button

Clicking on the Clone in VS Code is a feature that only works in a Microsoft Azure DevOps Repository and of course assuming that Visual Studio Code is the to be used to access Git. When Clone in VS Code is clicked on a dialog such as the following is displayed:


Clicking on the button, Open Visual Studio Code just opens Visual Studio Code. There is no initiation of cloning a Git repository.

Add Username to Git Clone URL

A URL used to clone git takes such as the following:
https://admiralgracehopper@dev.azure.com/admiralgracehopper/Frontend/_git/Frontend

Add the alternative username to the URL:
https://redsox%3APassingPlan@dev.azure.com/PassingPlan/Frontend/_git/Frontend

The %3A in the previous URL is just the HTML escape sequence for the colon character. The style of URL above is what should be used for cloning in Visual Studio Code.

Cloning Directly in Visual Studio Code

Visual Studio Code supports a Command Palette which on OS/X can be opened using ⇧⌘P (holding the shift-command and P characters at the same time). The Command Palette is a textbox that allows command-line style comments to be run against Visual Studio code.

To clone a repository, use ⇧⌘P, to open the Command Pallet and enter the following command followed by hitting the enter key: Git: Clone

When Git: Clone is entered in the Command Pallet, Visual Studio Code looks as follows:


Select Git: Clone from the drop down and you will receive the following prompt:


In the textbox (as shown above) paste the URL to clone which includes the username associated with the repository:


Pressing Enter (as instructed above) display the folder selection dialog so that the folder into which the directory clone is to be placed: